
This is a quick and dirty writeup discussing the Rock Band 4 drum kit on Xbox One and how to mod it for use with an MIDI capable e-drum kit. The TLDR is that it mostly works, but I can’t compensate for the deficiencies in the RB4 kit’s firmware, so, until Harmonix releases a fix, you’ll be stuck with the lag and possible dropped notes inherent to the current firmware.
As a note, old controllers apparently work just fine on the PS4 since they have a more open standard for allowing peripheral connections. However, my entire Rock Band catalog is on Xbox One, so that’s a no go.
Overview
The basic schematic for this is:
Drum brain -> MIDI trigger (powered by USB) -> Level shifters -> RB4 Drum Kit
Drum brain
You need to remap all MIDI notes on your drum kit so that any single pad triggers the the same MIDI note regardless of whether it is hit on the head/rim/edge. You should also take care of crosstalk and any other relevant settings on the brain as well. The MIDI out should connect to the MIDI trigger input.
MIDI trigger
Previously in Rock Band 1, I used a board from Highly Liquid called the MSA-P to trigger output signals from MIDI notes. Highly Liquid now has a more advanced and USB programmable version called the MIDIWidget. I ordered it with the terminal blocks pre-soldered and some MIDI ports to attach later.
The MIDI Widget should be powered via a micro USB cable.
The terminal outputs of the MIDI Widget will feed into the level shifters. In addition, the 5V out from the MIDI Widget will power the level shifters and can optionally be used to power the RB4 kit with the help of a 3.3V voltage regulator.
MIDIWidget ($60) + Terminals ($20) + MIDI ports ($7) = $87.

A example diagram showing how the MIDI in and outputs should be wired.
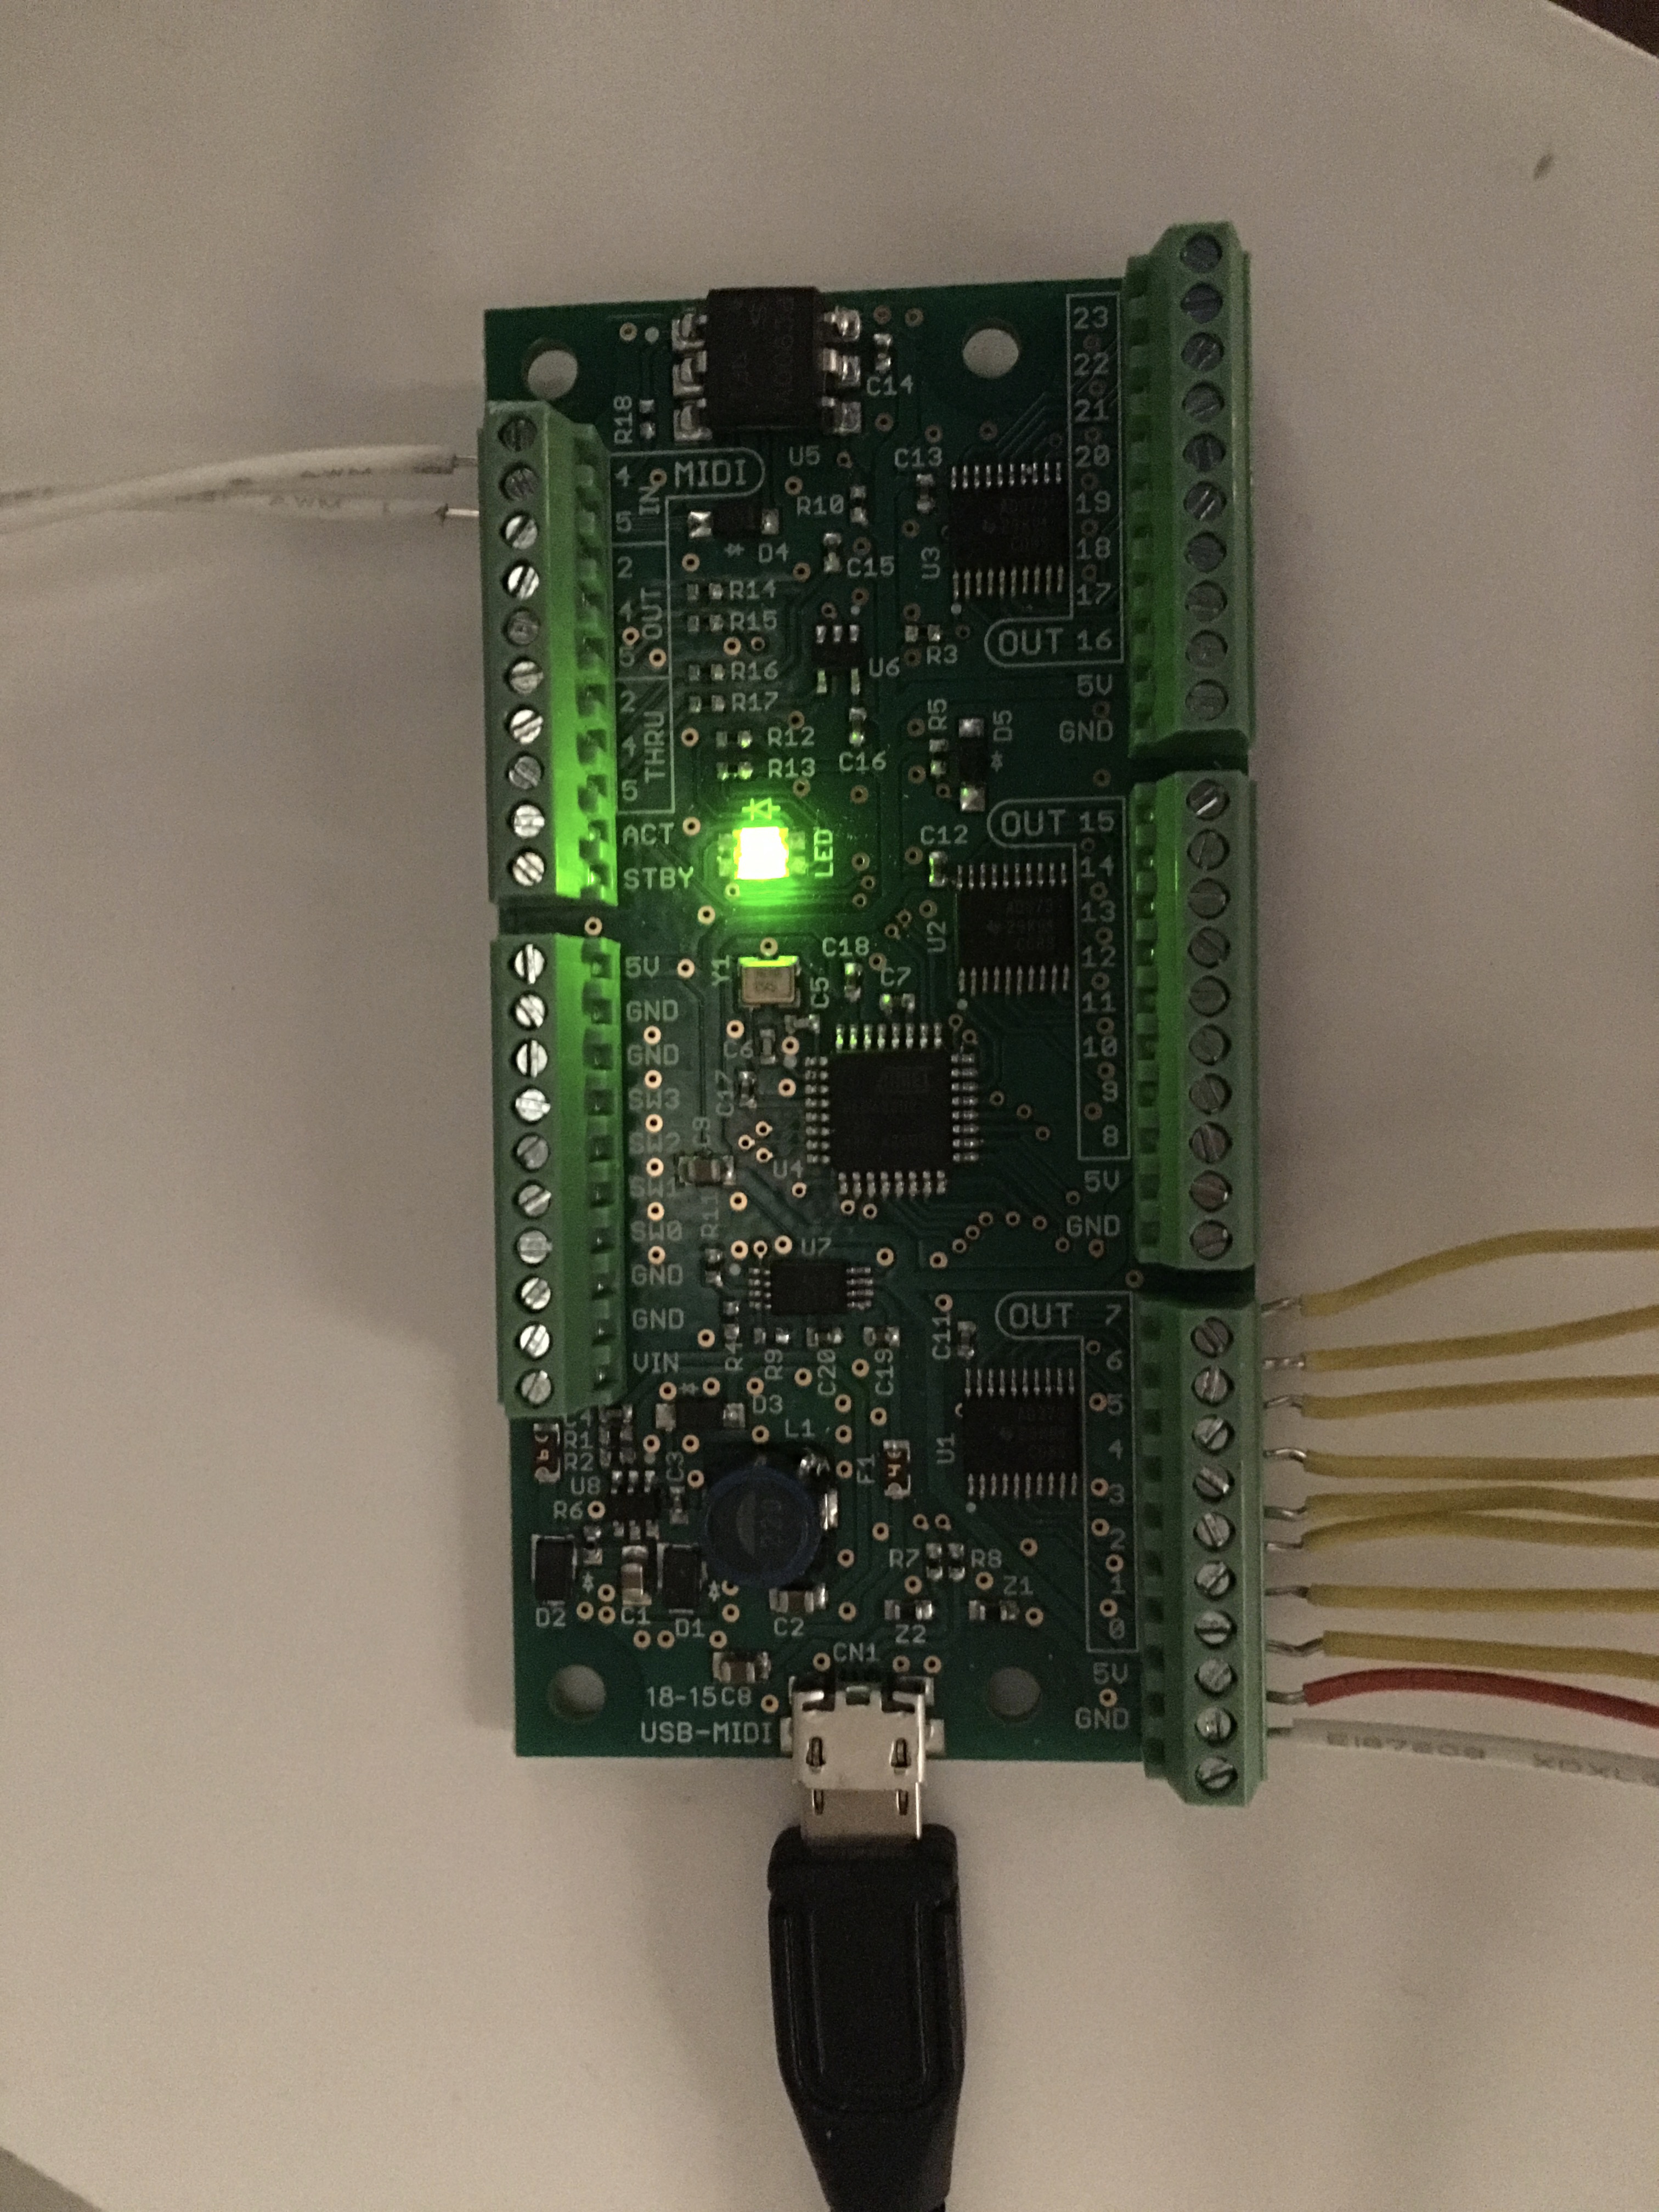
The actual MIDIWidget in practice.
As far as configuring MIDIwidget, see below. It’s important to set the Logic to Note On: Fixed Duration as a nearly instantaneous MIDI signal is confusing for the drum kit. I set the output duration to 25ms for all outputs, but it’s possible a different duration might be appropriate. Also notice that the first output is inverted due to it being the kick pedal, which needs to pull down to ground from 3.3V to be triggered (see more on that down below).

The settings for my drum kit in the MIDIwidget configurator.
Level shifters
The RB4 circuit board runs primarily at 3.3V. The output signals from the MIDIWidget are 5V. While we might be able to get away with that, for correctness, let’s use some voltage translators. I purchased some generic ones off Amazon since I wanted them right away, but if I had a few more days I’d probably order this 8-channel Bi-directional Logic Level Converter from Adafruit.
Cost = $8.00

The level shifters on a breadboard … outputs from the MIDIWidget are connected in this picture, but the level shifted outputs to the RB4 controller board are not. Note the 5V from the MIDIWidget feeds one side of the board, and 3.3V on the other side should come from the controller or from a 5 to 3.3V regulator (there’s one in this picture but I haven’t wired it up yet). Both grounds should be connected together.
Rock Band 4 drum kit
From the level shifters, you’ll need to connect to the eight signal pads I’ve identified on the main RB4 drum kit controller board, as well as 3.3V and ground. This will require tearing down the kit, which I outline below.
Other equipment
Screwdrivers (preferably some that are reasonably lengthy since some of the screw holes are deep.
Soldering station and solder
A spool of 22 gauge wire and wire strippers.
Some breadboards to help prototype everything.
Hot knife – to remove the controller portion of the kit. I used the Weller WSB25 – Amazon link.
RB4 drum kit teardown
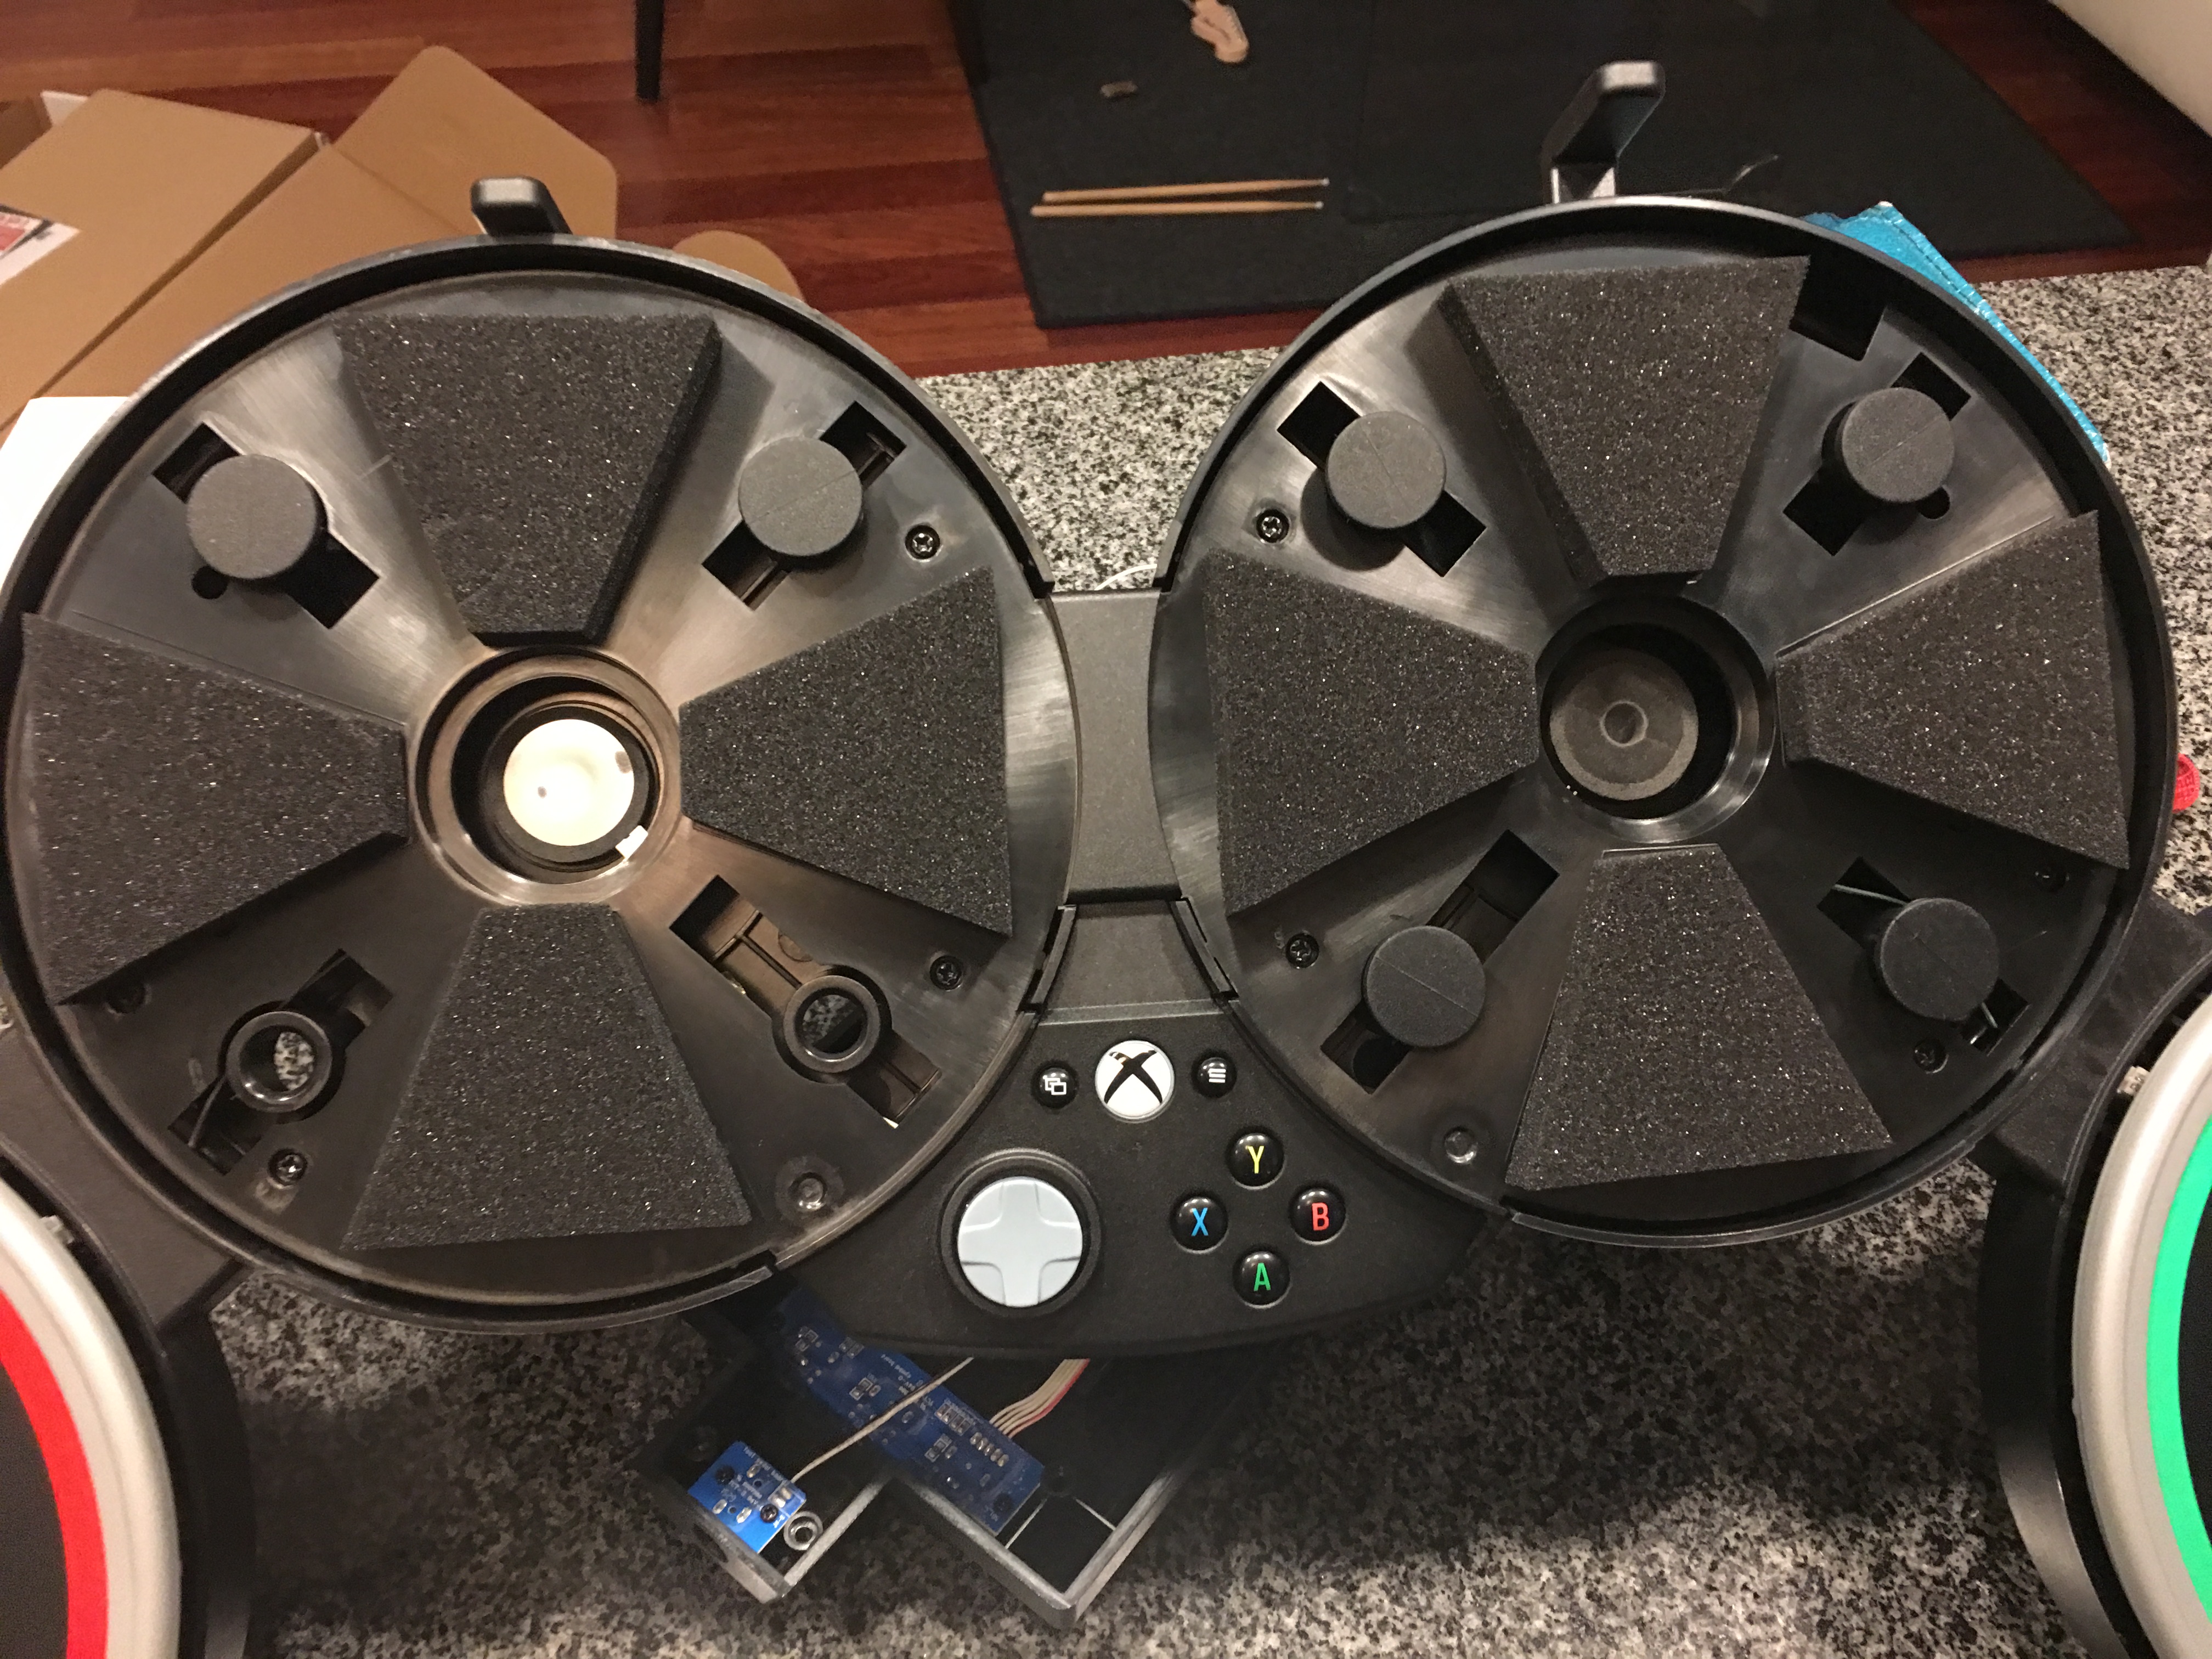
You can pull hard on the drum pads to remove them. Rubber stoppers may or may not come out along with the pad.
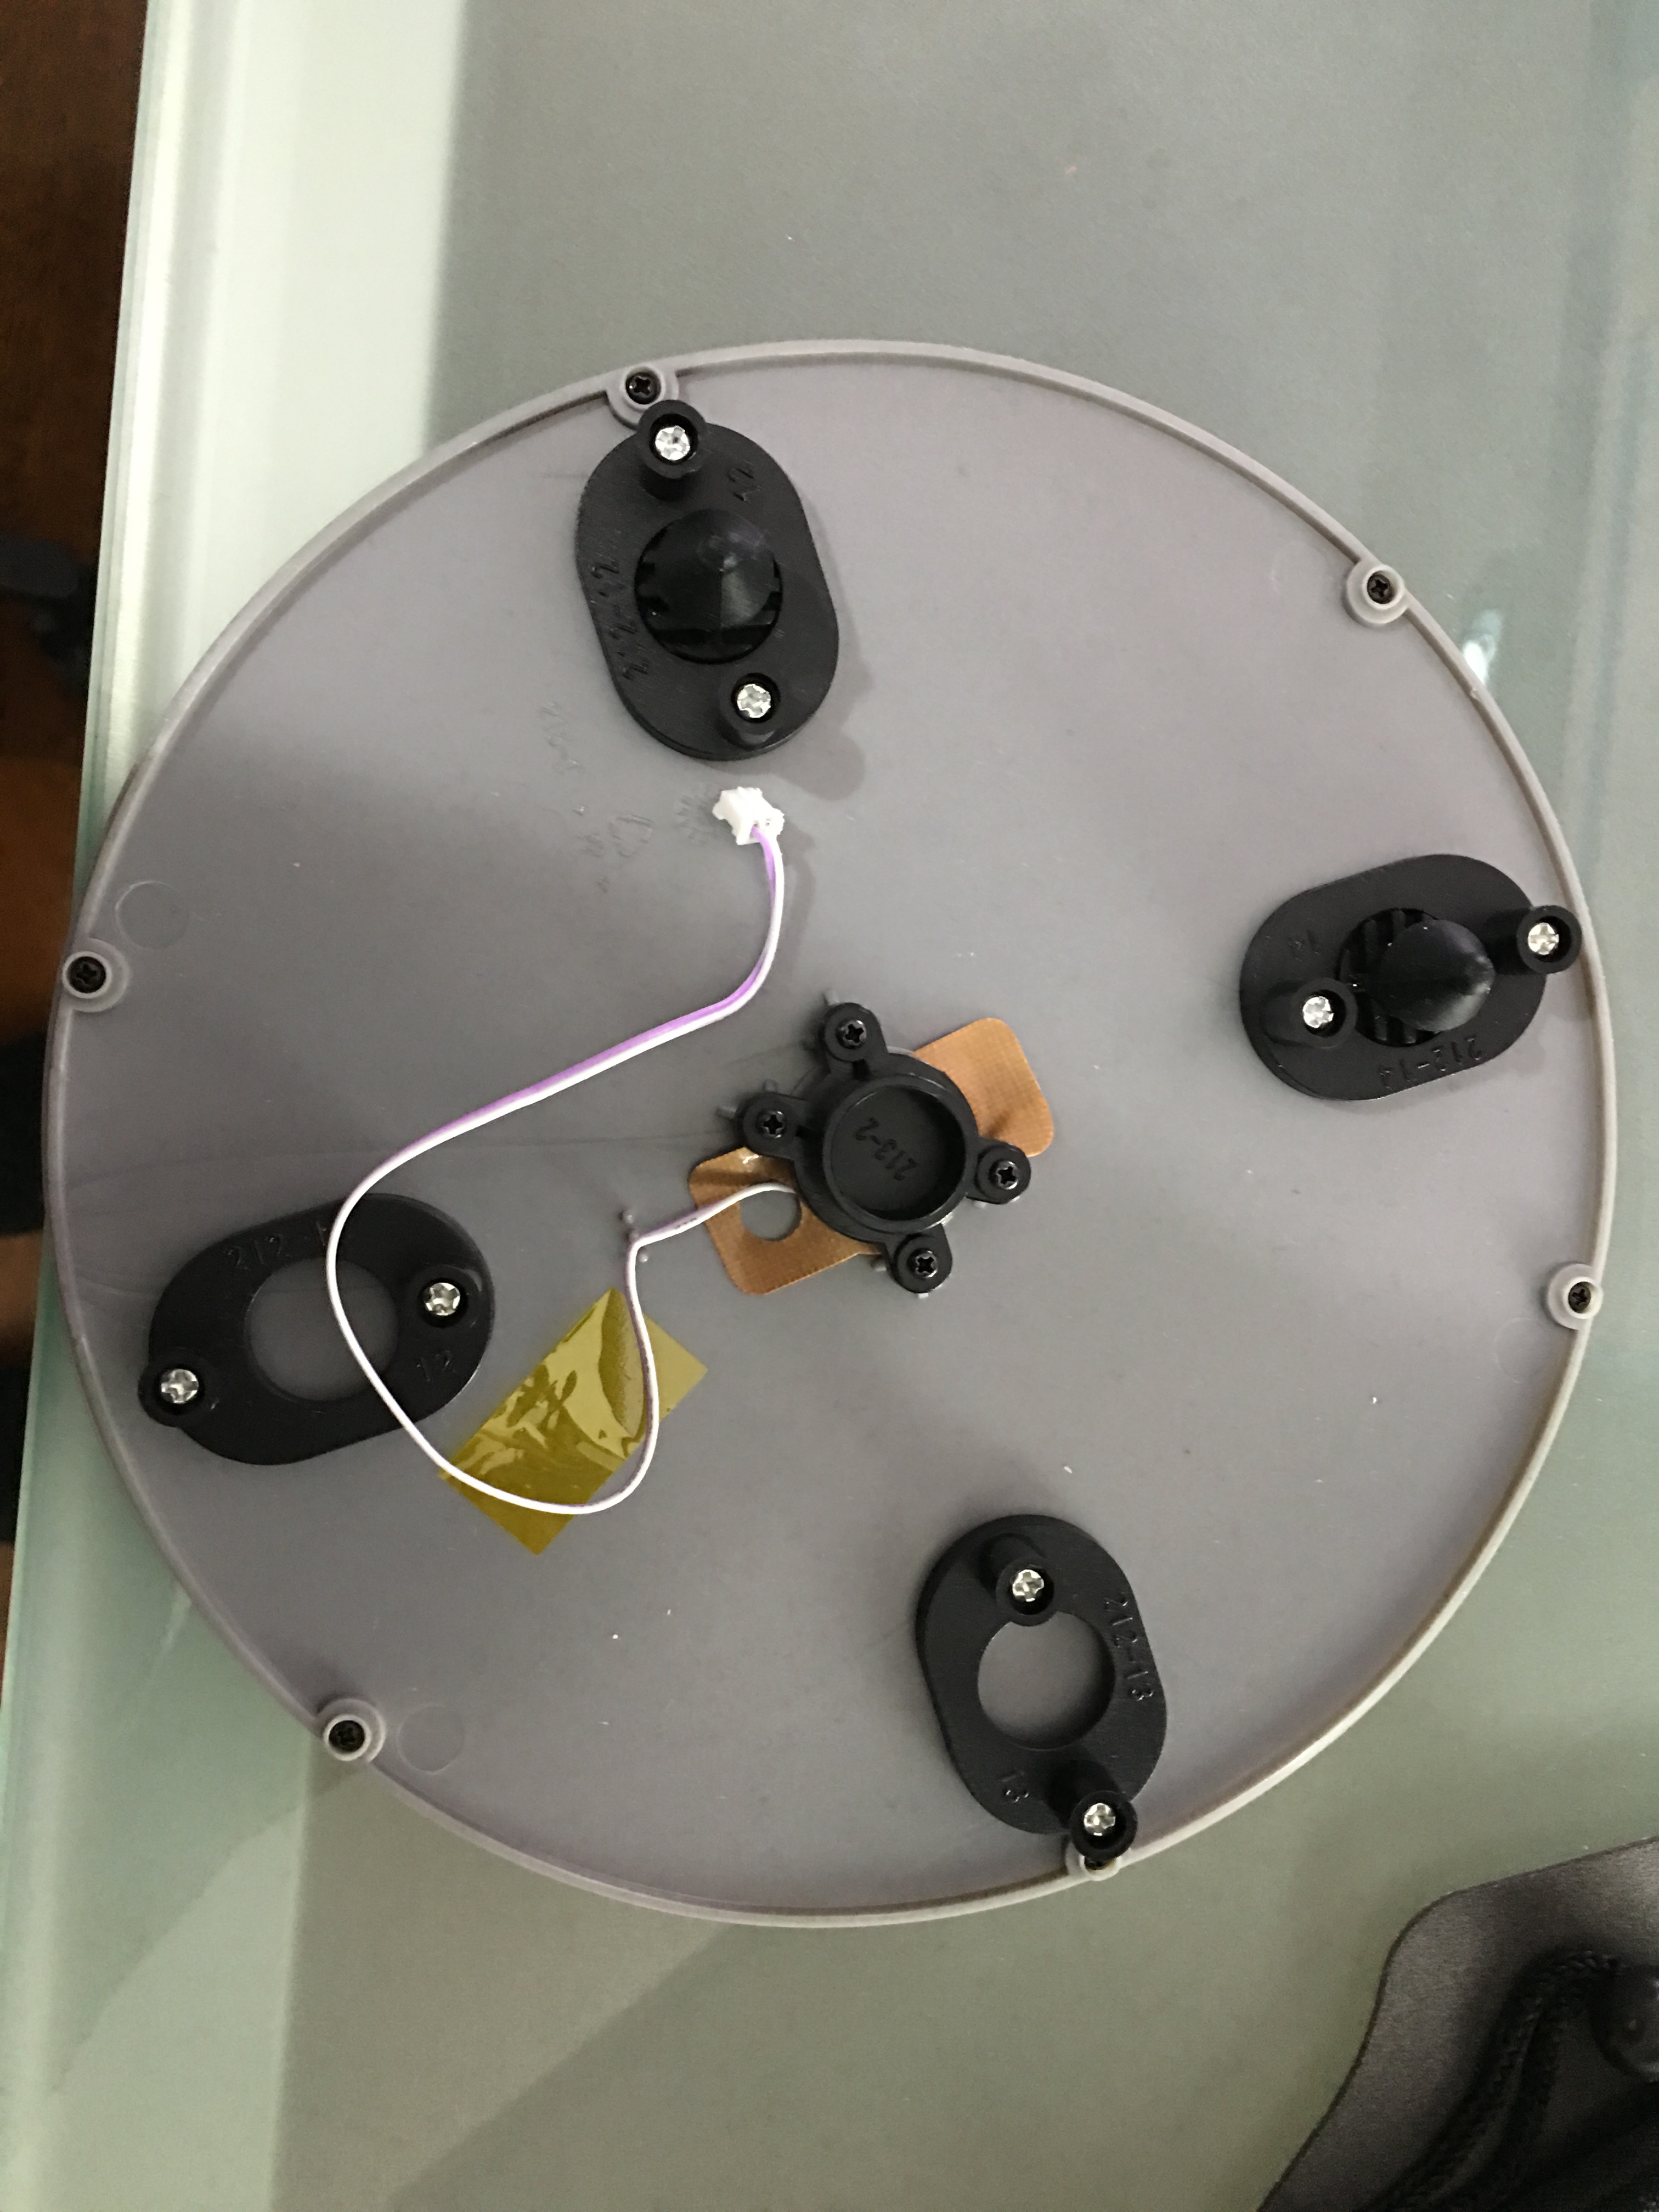
Here’s what’s under the drum pad. It’s just a piezoelectric sensor that connects to a jumper in the kit.

On the rear of the kit as well as in the controller portion, there will be several screws to remove. Some holes will have strange looking things that look like screws, but the heads are shallow and won’t fit anything you have. Ignore them, they aren’t actually screws.

Under the pads there are foam blocks. Under the foam blocks, there are additional screws you will need to remove to separate the controller from the kit. One screw under the inner area of each block and one under the outer portion of the top and bottom block.

The controller has been separated from the rest of the kit. Unfortunately, the front of the controller is also a huge portion of the actual kit, so we’ll need to cut the controller portion out by hand to make it more manageable.

Used a hot knife from Weller to cut away the controller front. Be very careful not to slice any wires you might need in the process!
Drum pads
The primary drum pads on the RB4 kit (red/yellow/blue/green) appear to have piezoelectric sensors that are connected to jumpers on the main board. The signal from the pads is amplified (presumably to a peak of 3.3V) and then passed on.
In game, the four drum pads can also be triggered by pressing the front buttons of the controller. Unfortunately, while it was easy to access the controller button solder points on the RB1 drum kit, there is no obvious way to do this on the RB4 kit.
Initially, I thought I was going to have to do something funky to simulate the piezo sensors (which are in the millivolt range). However, after further examination, I realized that Mad Catz left some bare test pads next to each drum pad jumper that expose the point right after signal amplification and before it reaches the signal processor for the kit. So we can simply pull up each test pad to 3.3V to trigger the respective drum. Note: I am not going for any sort of velocity sensitivity in this mod.
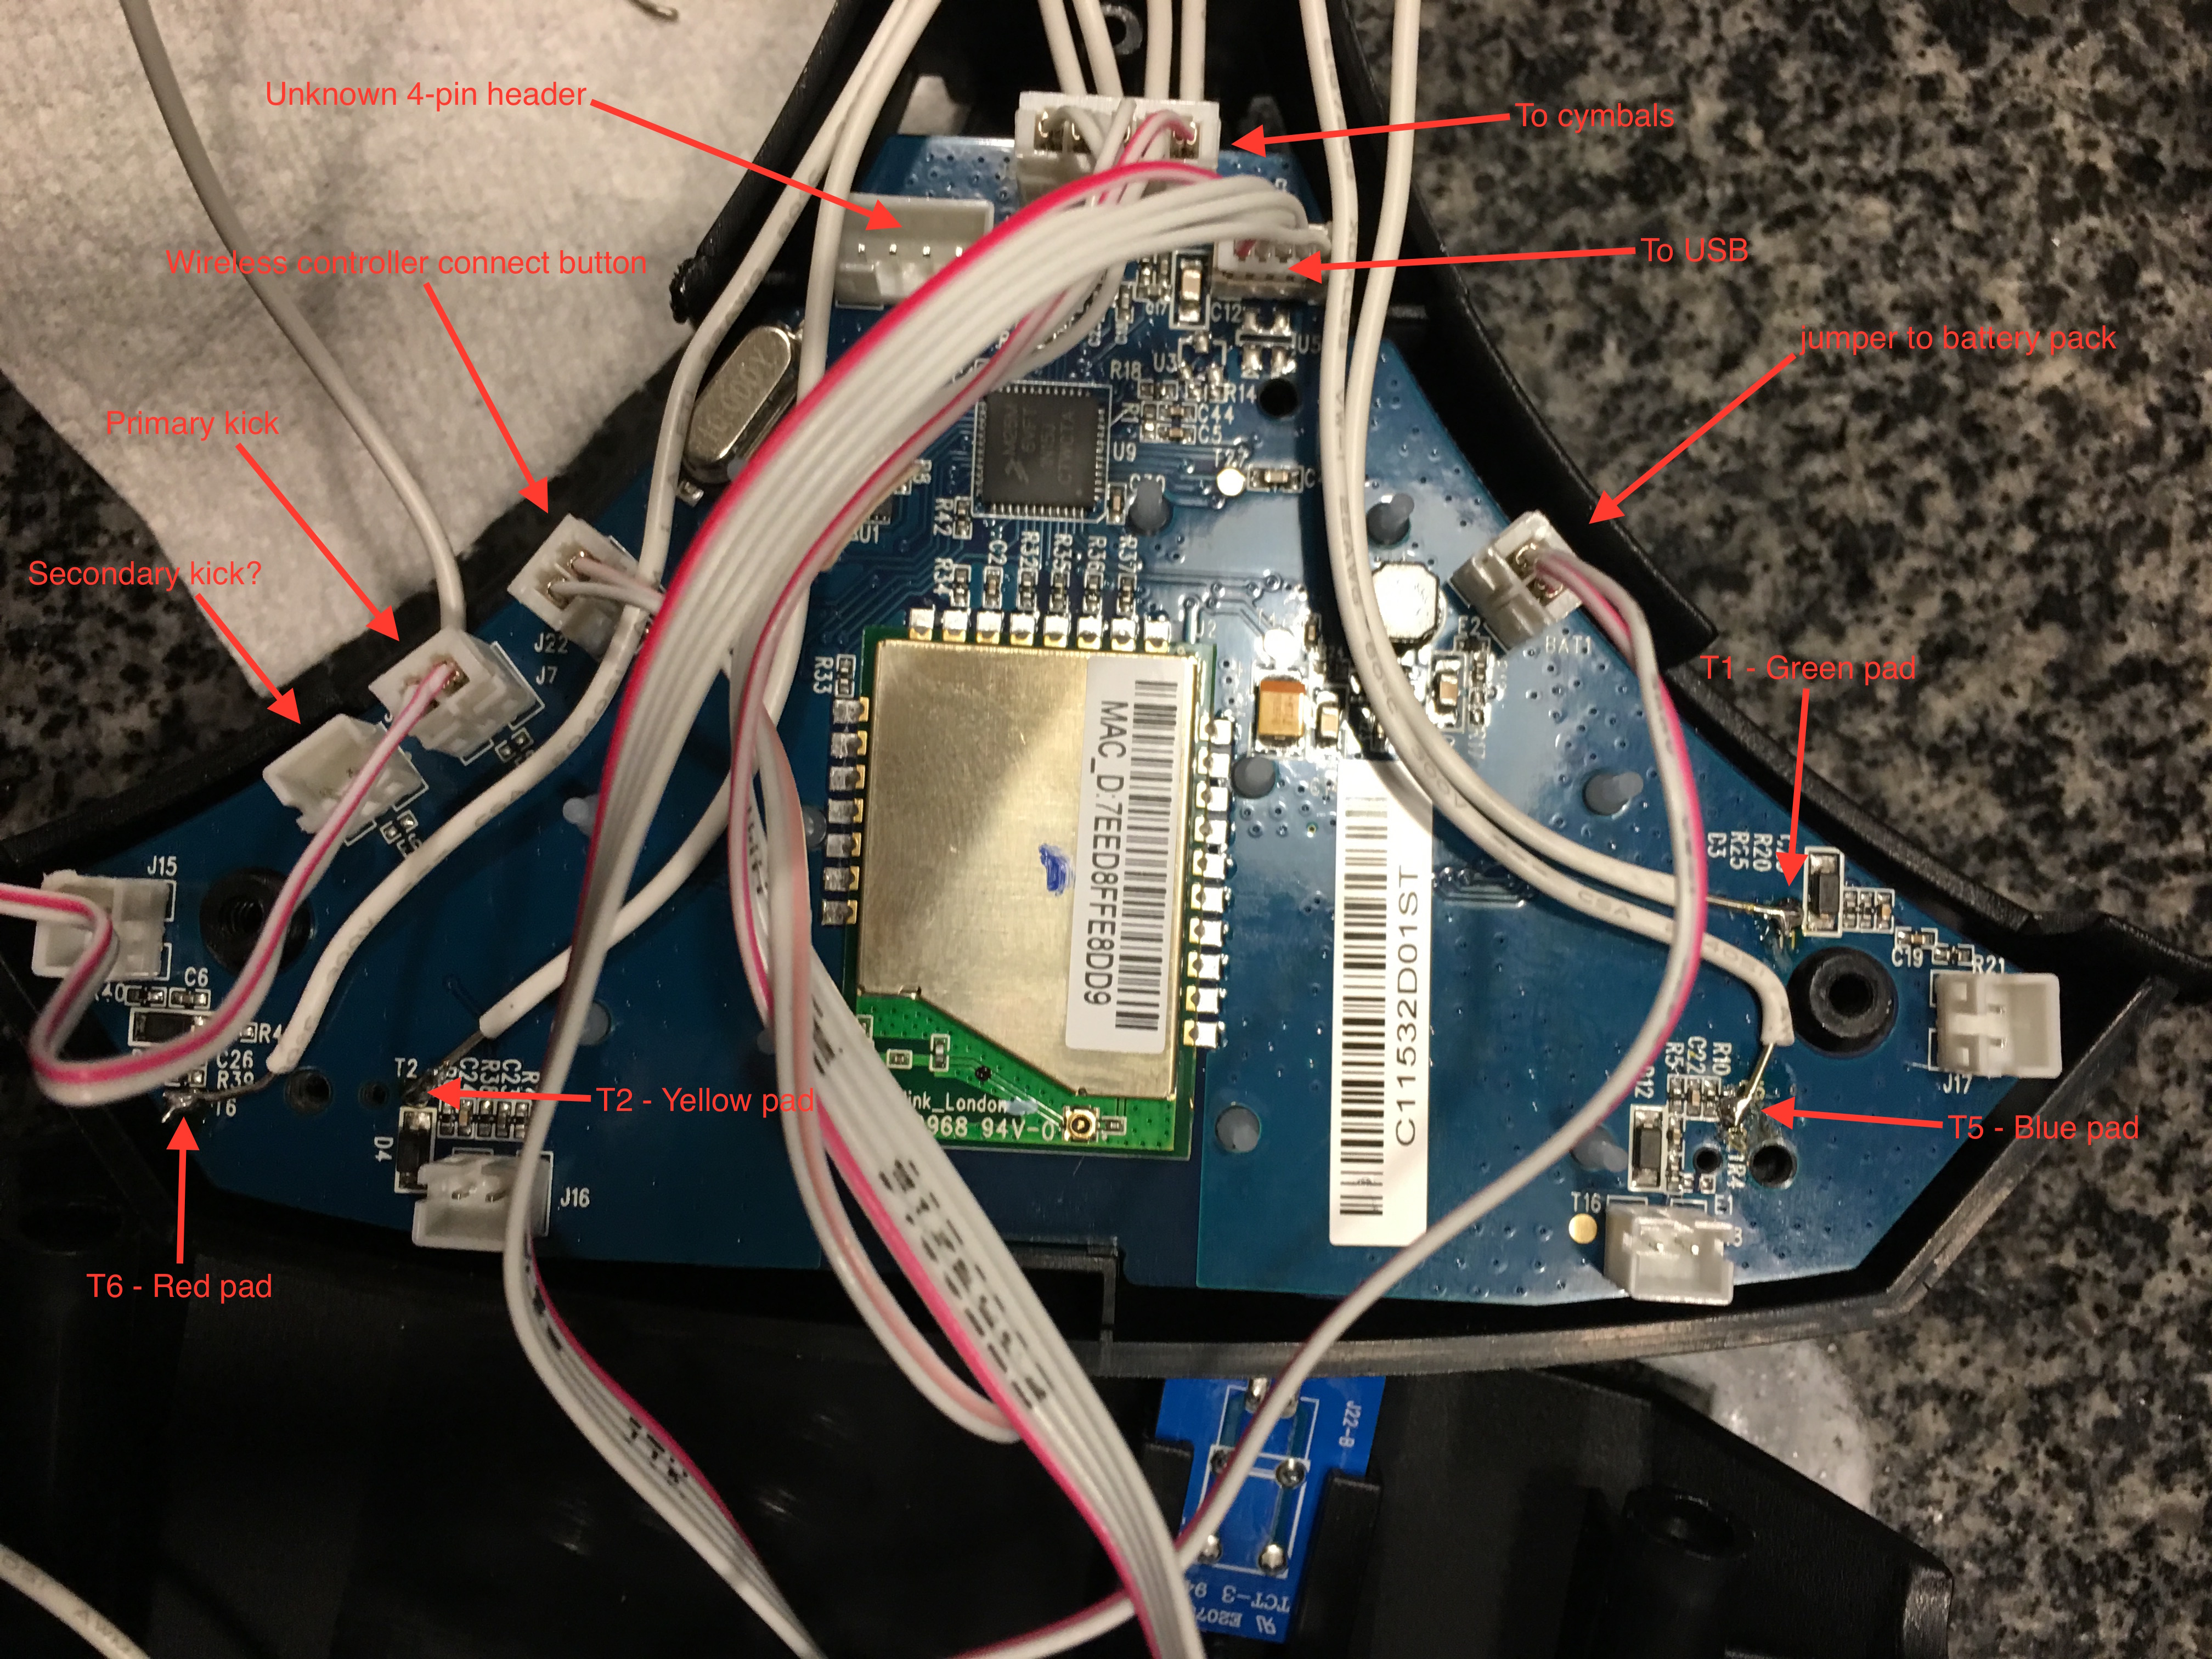
Annotated image of the rear of the controller board showing where to trigger the drum pads
Cymbals and kick pedal
The cymbals for the RB4 kit attach to the back of the kit. There is a small circuit board here that attaches to the main board via a ribbon cable. It appears that the piezo amplification is happening on the peripheral board and simply comes back to the main board via the ribbon cable.
Triggering the cymbals works just like the drum pads. We simply need to pull up each cymbal connection point to 3.3V.
The kick pedal works differently from the other pads. Like the cymbals, it also has a small helper board at the peripheral input point that does the signal amplification. However, at the main board, instead of poking the connection point with a 3.3V signal, the kick pedal is activated by pulling the kick pedal’s 3.3V line to ground. To account for this, the MIDIWidget output for the kick pedal needs to be inverted.

Annotated image of the front of the controller board showing cymbal and kick connection points
3.3V and ground
As noted above, the 3.3V line is important. I take ground from the negative terminal of the battery, and I take 3.3V from one of the solder points for the cymbal ribbon cable. Note that the positive terminal from the battery is unregulated power, usually in the 2.4V range. So you don’t want to use that. You should also connect the grounds from both the controlelr and the MIDIwidget together.
It should be possible to completely self power the controller via the MIDI Widget by feeding the 5V out to a 3.3V voltage regulator, and then connecting that over to the positive battery terminal. Obviously, you must remove the batteries if you do that. Update: I did end up doing this and it works perfectly.

The whole shebang. It will look nicer if/when I wire the chips up on a protoboard and use some breakout boards so I can run a DB-15 cable between the individual parts.
General comments and conclusion
I was rather pleased that I got this all to work, but then I realized the Rock Band 4 drum kit itself has actual serious problems. In particular, it’s adding 100ms of latency and possibly dropping fast notes on the drum pads and kick pedal. Context: regular e-drum kits have about 3 to 4 ms of latency.
How do I know the lag is this bad? It’s honestly so bad that simple observation is all you need. Also, in comparison, pressing the front face buttons has almost no latency at all. If you calibrate with the buttons via the pads, the difference is quantifiable and I’ve run it several times to confirm the difference.
We know that the Xbox One team worked specifically to reduce latency in the wireless controller, so the latency coming from the RB4 drum kit is unnecessary. There’s nothing special about the game that requires it.
Sadly, I can find no easy way to trigger the front buttons as a substitute for the drum pad sensors, short of soldering over the button pads. At any rate, there is no obvious equivalent instant button for the cymbals/kick.
Is the latency coming from the Rock Band software itself? Probably some, since the community hasn’t been able to calibrate A/V lag below 100ms. But considering the buttons vs drum pad hits show a large difference in latency, it can’t be the only factor.
So what are my outs on this? It’s possible there’s more that can be done with the surface mounted controller in the middle of the circuit board that would possibly allow zero lag triggering (ala the face buttons), but the solder points for that are so tiny that manually soldering to them is nearly impossible. It’s probably easier to hope/wait for a fix. The other option is to buy an old RB2 or RB3 controller along with a legacy adapter and mod that.
Whoever programmed the chip that is processing the incoming signal from the drum pads has made a horrendous mistake. If this lag is not fixable via a firmware update, the controller is basically junk.
Having spent quite a bit of money and time on this hobby, I’m extremely disappointed in Harmonix for releasing defective hardware. With this mod, I can play along with the game right now and it is enjoyable, but it is not as pleasant as Rock Band 3 was. All I can do now is wait and hope a fix is forthcoming.

Thank you so much for this update!!
Nicely done and thanks for the candid conclusions. I’ve modded my system to a Roland TD3, midi out to a Guitar Hero World Tour “Monsters of Rock” controller which is just ‘clipped in’ to that drum set. From there I can go to legacy wireless.
Drawbacks:
1) I can’t get into ‘pro mode’ with this controller. Nothing I do seems to enable the cymbals and I’ve tried a few work-arounds.
2) I had to go through the tuning process for a drum brain (module) from an Ion and while tedious, I only have one or two problems to address.
3) Latency is 95ms audio, 120ms video, with an A/V delta of 25ms. Difficult to say if I can still manage free-form fills at this time because my previous setup was 25ms audio, 120ms video on XB360. My guess is XBone is auto-set to Dolby Digital and you can’t turn this off. Connecting to Xbox 360 on RB3, turning ON Dolby Digital did increase audio latency to around 95ms, so I’m trying to figure out if that is something that can be turned off at the console level as no such option appears in RB4.
That said, I’m currently consistently top 25 on most songs on the first play, because the community is struggling that much.
I’ll further tune the drum brain for the only issue I’m having on the kit, and combined with your findings, I think we’re pretty much stuck until someone else comes up with a better idea.
Might it be worth checking out the stock kit with the new Rivals update. The pads on menus seems almost as fast as the face buttons now. Rolls seems to be more successful too.
if you guys ever want to try this game without latency, output to a CRT screen, or a device that takes in analog video.
It’s the hdmi video sync that causes the 100ms.
I see little about the circuit boards of rock band drum kits other than the first one (model before the cymbals).
I have the rock band 2 portable drum set (x360), and I like its modular form factor, but it has no plugs for cymbals, not allowing me to play pro drums mode of rb3 and up.
I took pictures of the pcb, you think you could help me to figure out if it’s possible to wire somewhere the cymbals ports as it’s technically an rb2 kit?
Contact me at boscopedro@live.com please.
Thanks.
Hey Richard, thank you so much for this post. I am wanting to do this, but the MidiWidget board is no longer available. Is there another option that you could please suggest? TIA