Further Tesla Full Self Driving thoughts

Just writing these down for posterity:

Changes lanes without real purpose. The car may not see far enough ahead to understand that changing lanes won’t allow it to make much real progress.

Needs to identify bad drivers and stay out of their way. Erratic drivers who can’t stay within their lane and cars driving too aggressively qualify.

Needs to avoid the trajectory of other cars changing lanes. The Tesla treats other cars as if they will do the “right” thing, so it likes to just zip on by other cars merging into the adjacent lane. In the real world, drivers are dumb and will sometimes keep changing right into your lane. There’s very little to be gained by assuming the other car is a reasonable driver … it makes way more sense to just slow down or speed up a little to allow the other car to do something stupid with no side effects.

Lane centering behavior needs improvement. Should stay more to the right on two lane highways. Should take into account like shoulder width when determining position within a lane … if you have more shoulder width, use that side of the lane more.

Posted in Cars, Tesla | Leave a comment

Thoughts on Tesla’s Full Self Driving 12.3.3

Elon has done us Tesla owners a solid and given us a free full month of self driving. To me, the current 12k price is pretty outrageous and the 199 monthly subscription is a bit more interesting … but free is a good price. 🙂

So how well does it work? Well, I found myself pleasantly surprised. I was not expecting a hands off experience and certainly did not get it. But I did think it made my driving experience easier.

My initial experience was with engaging it on the highway. At the default setting of Average (Chill/Average/Aggressive) I still found it passing too aggressively for my taste, so I ended up turning on a “minimize lane changes for this drive” setting. That was much less aggressive … almost equivalent to autopilot. Later in the day, I would discover that using the turn stalks directs the FSD to perform a lane change. So, in summary, I settled on FSD’s chill mode and without the “minimize lane changes” setting as my sweet spot. If I want a lane change, the turn stalk does that for me and I don’t find that burdensome.

We passed through a couple of tollways … but I was not brave enough to keep FSD engaged to see what it would do.

Later in the day, I found myself on some rural highways. FSD was not good about going with the flow of traffic or hovering around the speed limit + the specified offset. For some reason, it would constantly go about 10 mph slower than I wanted it to and there seemed to be no way to get past this short of constantly depressing the accelerator to encourage it to go faster. It also constantly reset its speed, requiring me to constantly fiddle with the scroll wheel or accelerator.

For two short trips, FSD did quite well navigating to the destination, but, at the final turn-in, it would turn in early, missing the destination completely and requiring me to correct it. This even contradicted the nav system guidance, which seems odd.

The behavior at stop lights was rather strange. It would both launch too aggressively and brake too aggressively at these rural highway traffic lights. I suspect the combination of highway speed limits (50 to 60 mph) interspersed with traffic lights is causing it to accelerate and decelerate too quickly … as, by way of comparison, I didn’t see such behavior in the Bay Area. This seems like something that shouldn’t be an issue in 2024, but it also seems easily solvable? In general, I think there needs to be some negative reinforcement in the training around excessive G forces. This type of issue seems so unnecessary.

Finally, along with FSD came Autopark. This was a big favorite with the wife, even though I am the one mostly driving. Once you slow to a crawl in a parking lot, an external visualization comes up with parking spots that you can tap on to select them. Then, you can press a button to park. The car will set itself up and then back in slowly.

I found this to be quite fun and convenient. It can even parallel park. However, I did not stress test its behavior with cars on both sides or spots that were too small, so someone else will have to give you that info. My only criticism of this feature is that while it parked well, it sometimes didn’t center itself perfectly within the lines. I found this odd as one imagines a computer should be able to do this perfectly every time.

Overall, irrespective of price, I found FSD to be useful, but still requiring some obvious tweaks, and Autopark to be quite useful. I do not know how much I would pay for these features and suspect I might not ever know unless the price comes down to something that would make it an actual decision. Tesla’s default autopilot is quite good and takes a lot of the pain out of long highway stretches, and I generally don’t find it that hard to park. I’m comfortable with my own driving style, but, in the future, could see myself shelling out for these features to keep my kid, wife, or parents safer.

Posted in Cars, Technology, Tesla | Leave a comment

Tesla Model Y – Best charging practices

Earlier this year, I joined a fairly large segment of the population in purchasing a Tesla Model Y. It’s currently the best selling car in the world by some accounts … so it’s certainly not unique. But it’s new to me.

I have a lot of thoughts about this car. Spoiler alert: I’m thoroughly enjoying it. But we’ll focus on one question for now … and it’s an obvious one. When you get the car, you want to know “What’s the best way to charge this thing?”

Tesla’s answer (dumbed down for consumers)

Tesla guides you to their answer in a couple of ways.

First, in most Tesla’s, the car displays some indicators on the charging screen about Daily vs Trip charging limits. The implication is that you should keep the charge limit somewhere in the Daily charging limit range most of the time. which is usually anywhere from 50% to 90% battery state of charge. The Trip charging limit range goes from 90% to 100% (and sometimes 80% to 100%). The implication of that one is that you should only charge that much when you really expect to need the extra miles of range … such as a long trip.

Second, in certain Tesla’s with LFP batteries, they avoid displaying the “Daily” vs “Trip” charging range indicator, and instead simply show a 50% to 100% charging limit range. With this different charging screen, they’re giving people the OK to charge to 100% most of the time.

The real answer (for nerds)

OK, sounds good. But is what Tesla guides the average customer to do really the best way to charge?

The answer to that depends on a few factors. As with many things, the binary fallacy is something to avoid here … there is no exact single good way to charge your car. Charging best practices vary on your particular situation … and mostly on your driving patterns.

Calendar Aging

One main takeaway you should have is that for most drivers, the amount of miles you drive is not the dominant factor in battery capacity loss over time. Instead, it’s calendar aging … aka, the inevitable passage of time.

And, as far as calendar aging goes, it turns out that is that charging to and letting your car sit at around 50% is significantly better for battery health. This is true even of LFP batteries.

The following graphic illustrates this quite clearly.

Ref: Calendar Aging of Lithium-Ion Batteries

But if this is true for LFP battery cars, why does Tesla have a different charging screen for those cars? The answer is most likely because hiding the distinction from consumers encourages simple and mostly acceptable charging behavior.

Tesla doesn’t want customers to get scared off by the idea of having to micromanage their battery health. The truth is that there are all kinds of vectors along which you can keep your Tesla’s battery healthy. LFP batteries behave differently in three major ways from other Li-Ion batteries.

  • LFP are less energy dense. That’s not great.
  • LFP batteries age about half as quickly. This is good!
  • LFP batteries have a particularly flat voltage curve. This makes calibrating them more difficult than other Li-Ion chemistries.

So given all of the above, the reason Tesla took away the daily/trip indicators is that:

  1. They need you to charge the car to 100% every so often to calibrate battery level estimates (due to the flat voltage curve)
  2. They decided that the improved durability of the LFP battery chemistry can handle the additional stress on the battery well enough.

But make no mistake … you can still extend the lifetime of your LFP battery quite a bit by leaving it at 50% or lower as much as possible while parked.

Depth of discharge

The other dominant factor is referred to as depth of discharge (DoD). It turns out that the battery literally physically expands and contracts when charged to full and discharged to empty. This expansion causes microscopic cracking and degradation within the battery.

Basically, charging to 100% greatly decreases the battery lifetime. If you do it repeatedly, it will become the dominant aging factor above and beyond standard calendar aging.

Summary

All in all, a better way to charge a Tesla for extended capacity over time is as follows.

General best practices for maintaining maximum battery capacity

  • Always plug the car in at your home location(s)
  • Use scheduled charging to reach your desired state of charge right when you expect to leave. This keeps the battery at a lower state of charge overall.
  • Set the charge limit to the lowest amount possible that meets your daily commuting needs and whatever buffer you deem psychologically necessary to feel comfortable. In Tesla’s, this can be as low as 50%.
  • If you have a longer day trip planned, raise the charge limit so that you’ll have whatever range you need by the time you leave.
  • Level 2 charging is better than Level 3 “supercharging” for your battery. So keep your supercharging stops to a minimum … use them when you need to top off right away, or when you are road tripping.
  • Keep your car parked in shaded or cool areas whenever possible. Heat ages the battery faster. If you park in a hotbox garage, consider installing a fan to vent the trapped heat.
  • Avoid charging above 80% unless absolutely necessary. I wouldn’t even do it on trips since most of the time you can operate in the 80 to 20 percent range to get to the next supercharger. But if you need to go to 100% to get somewhere with a margin of safety, do it.
  • When letting your car sit overnight or for longer periods of time, try to do it at an SoC of 55% or lower.
  • Unfortunately, I have to recommend avoiding the Scheduled Departure feature as I’ve found it to be unreliable. Use Scheduled Charging instead. Hopefully this gets fixed.
  • I don’t recommend buying any particular model of Tesla if you regularly need to charge above 80%. You’ll find yourself aging the battery, which will require you to charge the battery even more, and so on … which will accelerate a kind of “doom loop” in the aging process.

Personal interpretation

If you want to know what this looks like for me …

I do keep the car plugged in every time I park at home.

I’ve simply gotten used to leaving the charge limit at 50% and setting a scheduled daily departure time of around 8 AM. This usually means the car will start to top off around 2AM to 4AM. I’ve found that for most of our weekend errands, we can be out for most of the day in a 30-45 mile radius around us, and I’ll still get back with 20% battery.

For longer day trips, I will set the charge limit higher … typically enough to reach the destination at 50% SoC … and then draining below that to make our way back.

For long distance trips, I just charge to around 70 to 80 percent. In our experience so far, charging to 100% hasn’t ever actually removed any stops for us on our road trips. Someone needs to take a bio break anyway, or things are just spaced in a way where the extra charge never really helps us.

So this works plenty well for us. We only drive on the weekends right now, so calendar aging will definitely be the dominant factor in our Tesla’s battery capacity loss.

So far, I can’t see any range loss at all on the car after 6 months, so that’s nice. Over time, I hope to see the benefits of this approach with a still relatively high range after a few years!

Posted in Cars, Technology | Tagged , | Leave a comment

How to fix Ubuntu 20.04 on the Lenovo ThinkCentre M920q / ThinkStation P330

I mentioned a few months ago that Ubuntu 20.04 was unstable on my Lenovo ThinkCentre M920q. 18.04 worked fine, so I kept it on there until development circumstances forced me to upgrade.

I took a gamble that the issue might have been fixed in a point release … but no such luck. Luckily, I came across a thread at Lenovo’s forums where a user discovered that disabling the audio in the BIOS appeared to prevent the random hangs after install. This so far has done the trick for a day or two, although I can’t guarantee it completely. But looks promising!

So now I’m back to working off a nice 8 core ultra SFF PC instead of the older 4 core I was about to switch to. Hooray!

Posted in Technology | Leave a comment

How to REALLY fix Chrome Remote Desktop on Ubuntu 18.04

So, as I hinted in my last post, I’ve been fixing up an Ubuntu machine to do some development on.  This machine needs to be headless because it isn’t my primary development machine, and running a VM everywhere I have a Mac has become incredibly painful and slow … especially with having to keep them all up to date.

The first problem here is that basically every free remote desktop solution I’ve tried is ALSO incredibly slow and painful.  Except for Chrome Remote Desktop, which is doing something reasonably smart and encoding the screen with VP8 to send to the remote client.

However, the problem with Chrome Remote Desktop is that it’s configured by default to login on a completely separate X desktop from the logged in user.  Which … I don’t know, maybe I could get that to work, but also it makes it really weird when I’m trying to troubleshoot back and forth on the computer directly vs a headless login.

I found a post titled “How to Install Chrome Remote Desktop on Ubuntu 18.04” and it really seemed like it was going to fix all of the above by modifying the startup script to point at the logged in display number.  Sadly, it really didn’t end up doing that at all.  But at least pointed me in the right direction!

What the aforementioned script does is tell you to look at your current X display number and just hardcode that into the script.  This ends up not working at all, because in my experience, the logged in display number isn’t a constant thing, even if you enable auto login.  So the script just ends up failing with nonsense that you have to dig out of the logs.  In fact, it’s sort of worse that not working because it appears to work at first when you try it out for the first time, but as soon as you reboot you might just lose access to your machine completely when you need it the most.

The solution to this I came up with was to A. auto login my user and B. modify the script to wait for the logged in user and retrieve the actual display number before continuing.

There are, of course, caveats with this whole approach that could use additional hardening, but it’s “good enough” for what I need to do, so I’ll just leave it at that.

So, in addition to the script modifications in the above linked post, look for where FIRST_X_DISPLAY_NUMBER is hardcoded in the script. Instead of replacing it with a hardcoded number, use the following code:

FIRST_X_DISPLAY_NUMBER = None
for x in range(0,10):
    if x > 0:
        time.sleep(10)
    W_OUTPUT = subprocess.check_output("w")
    print("W_OUTPUT: {0}".format(W_OUTPUT))
    W_OUTPUT_LINES = W_OUTPUT.splitlines()
    if len(W_OUTPUT_LINES) < 3:
        continue

    FIRST_USER = W_OUTPUT_LINES[2]
    print("FIRST_USER: {0}".format(FIRST_USER))
    FIRST_X_DISPLAY_NUMBER = FIRST_USER.split()[2]
    print("FIRST 1: {0}".format(FIRST_X_DISPLAY_NUMBER))
    if FIRST_X_DISPLAY_NUMBER is None:
        continue

    FIRST_X_DISPLAY_NUMBER = FIRST_X_DISPLAY_NUMBER.strip(":")
    print("FIRST 2: {0}".format(FIRST_X_DISPLAY_NUMBER))
    FIRST_X_DISPLAY_NUMBER = int(FIRST_X_DISPLAY_NUMBER)
    print("FIRST 3: {0}".format(FIRST_X_DISPLAY_NUMBER))
    break

And voila!  Chrome Remote Desktop will start on whatever X display the logged in user is on.

Posted in Uncategorized | Leave a comment

Ubuntu 18.04 – how to fix auto login

I always joke that when a new release of Ubuntu comes out, it’s time to f*** up all my computers. It’s funny only because it’s true.

The plan had been to use 20.04 when it came out last week, but as it turns out, it’s completely unstable on the target hardware I had in mind, but 18.04 luckily doesn’t seem to have the same problem. That’s a discussion for later.

Today’s post is a quick note on fixing auto login in Ubuntu 18.04 (although there’s a good chance this is still an issue in 20.04).

It seems that simply going to Settings/Details/Users and checking auto-login doesn’t really do the trick. Subsequent reboots would leave the computer at the login screen randomly … seemingly triggering the bug often after issuing a manual reboot command, but sometimes working properly if rebooting via the GUI (gnome desktop manager, the default for 18.04).

Anyway, what fixed it for me was this link. The auto-login switch sets the AutomaticLoginEnable and AutomaticLogin entries, but enabling the TimedLogin variables is what made things start working.

Posted in Uncategorized | Leave a comment

Working around pfSense Unbound DNS race condition on startup

I previously wrote an article on how well pfSense has worked for me.  I’ve so far managed to get it to do everything I have thrown at it, short of integrating fully with my UniFi based network.

There is one very annoying problem I ran into over the past year.  pfSense frequently fails to start now with a race condition related to the DNS server it runs (unbound).  the error is something like the following.

rc.bootup: The command ‘/usr/local/sbin/unbound -c /var/unbound/unbound.conf’ returned exit code ‘1’, the output was ‘[1564567621] unbound[28399:0] error: can’t bind socket: Can’t assign requested address for <ipv6 redacted> port 53 [1564567621] unbound[28399:0] fatal error: could not open ports’

I suspect this is a race condition related to bringing up various VPN or VLAN interfaces.  Fortunately, because pfSense has been so stable, I haven’t ever run into this problem outside of a attended restart.  However, I would have to connect to the server and start the unbound DNS service by hand.

Anyhow, for whatever reason, this hasn’t come on up on the radar of the pfSense developers to fix.  So what else could we do?

It turns out a pfSense package exists called Service Watchdog.  It monitors selected services and restarts them if they aren’t running.  So the workaround is simple.  Install Service Watchdog, monitor the DNS service, and it will keep kicking unbound until everything is up and running.  Usually just on the first retry.

And with that pfSense is back to being the appliance I need it to be.  Hooray!

Posted in Networking, Technology | Leave a comment

Adventures in cooling the UniFi US-8-150W

After hearing about Apple discontinuing further development of the Airport Extreme, I decided to switch to Ubiquiti’s UniFi line of wireless gear about a year and a half ago.  The internet is full of great reviews, so I didn’t need much prodding.

Well, suffice it to say that I’m a fan.  I can get into the details later, but, for now, this post is about one very specific problem and how I fixed it to my satisfaction.

The problem

I am in the fortunate/unfortunate position of having all my cabling home run back into an On-Q structured enclosure.  This enclosure has very little room for extra cooling or power.
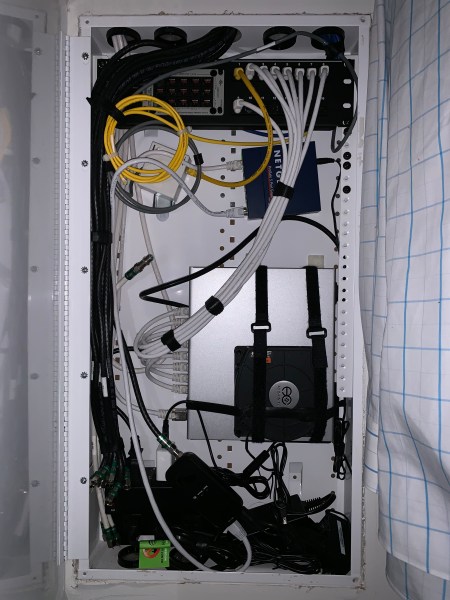
IMG_5422

My On-Q enclosure

These enclosures are only a few inches deep and a bit hard to work in.  Not anywhere near as nice as having a whole room or a closet dedicated to a rack mount.  But, on the other hand, there’s a small ecosystem of On-Q stuff that makes them still much better than nothing at all … provided you are willing to pay extra for everything.

us-8-150w-1_1024x1024

UniFi Switch 8 (150W)

The switch I have in there now is Ubiquiti’s US-8-150W.  It provides 802.3at Power over Ethernet to all of the ports in my condo.  I’m lucky this product exists, because the next step up is rack mount sized and wouldn’t fit very well in the enclosure.

Anyway, a lot of people have noticed how hot the US-8-150W gets … myself included. At times, I would notice the switch getting up to 73C in the controller software when I was out for the day and the AC wasn’t running.  Locating the switch in an enclosure like this is basically the exact opposite of what the documentation tells you to do.

Now … 73C isn’t that bad, but I know most parts are rated around 70C and my OCD was kicking in.  So I set out to figure out how to get this thing cooler.

Research
I found the following threads (and a few others):

US-8-150W Fan Mod

Is there a problem with US-8-150W switches?

US-8-150W Temperature Range – Is the datasheet wrong?

From these threads, I found a few creative approaches … several folks who simply pointed various fans in different ways at the switch, some who attached cpu heatsinks to the top case (both active and passive), and even some who bothered to open up the case and try adding an active fan.

In any case, it was nice to see the concern about heat was shared by quite a few people and not just myself.  The US-8-150W, if you didn’t know, is passively cooled.  This is one of its great assets, since it runs silent, but also contributes to a high operating temperature.

Potential solutions

With some extra information under my belt, I considered the following options.

  1. Attach passive heatsinks: An appealing option due to the somewhat lower invasiveness and not requiring any moving parts or power.  However, removing the adhesive could be a bit of a pain if I ever needed to use this switch in a different environment or resell it.
  2. Attach a low profile blower fan to the top case: A very appealing option once I discovered the right fan – the AC Infinity MultiFan S2.  It has rubber feet and adjustable speeds, plus the profile was about an inch.  Perfect fit!
  3. Attach a regular fan to the top case: The AC Infinity MultiFan S3 is basically just like the S2, but with a regular fan.  While it would be a better option in an open air environment (larger fans produce more airflow with less noise, especially compared to blowers), it just wasn’t a very practical option due to the low profile of the enclosure.  I ruled this out pretty quickly once I found the blower fan existed.
  4. Attach some small fans to the side vents: I ruled this out because, while it would be effective blowing into the case, trying to mount them for effective airflow and still support the switch on its side in the enclosure would be very awkward.  Also, I wanted to avoid any potential dust buildup inside the switch if it wasn’t necessary for my target temperature.
  5. Attach some small fans to the unused enclosure cabling holes to vent air: In an enclosure like this, it seemed like a good idea to try actually moving air through the enclosure instead of just blowing hot air around inside.  While I didn’t decide against this, I figured I could try other easier approaches first before going down this path.

In the end, I decided to order the passive heatsinks (along with various thermal pads and adhesives) and the blower fan and experiment with the results.

Initial testing

The first thing I did was establish a baseline of 69C.  This was at night with the enclosure closed so that heat would build up to a steady state inside.  All further tests were run by allowing the switch inside to reach a steady state temperature.

First, I tested the fan on the top case, as seen in my enclosure photo above.  I was able to strap it on pretty easily.  With the fan speed set to low, this lowered the temperature to 65C.  Not quite as good as I had hoped.

Next, I raised the fan speed to medium.  This lowered the temperature to a mere 64C.  Since I didn’t want a noisy fan to begin with, and raising the fan speed wasn’t scaling very well, I didn’t bother raising the speed to the high setting.

At this point, I was poking around the switch and noticed that the bottom was unusually hot … hotter than the top had ever felt!  So I tried something different and placed the fan UNDER the switch’s bottom.  This was somewhat awkward to pull off in the enclosure, but certainly doable.  To my surprise, this dropped the temperature to 60C!

Now that piqued my curiosity.  It seemed pretty clear that the CPU was thermally interfaced to the bottom of the switch.  It was time to open the thing up anyway.

Opening the US-8-150W

Opening the US-8-150W is pretty easy.  Simply unscrew the two screws on the back, and slide the top case forward a bit to unlatch.  Then lift the top off, being sure to disconnect the header for the front panel as you do so.  There’s some resistance sliding the top forward that may require a bit of prying, but that’s really all you need to do.

IMG_5425

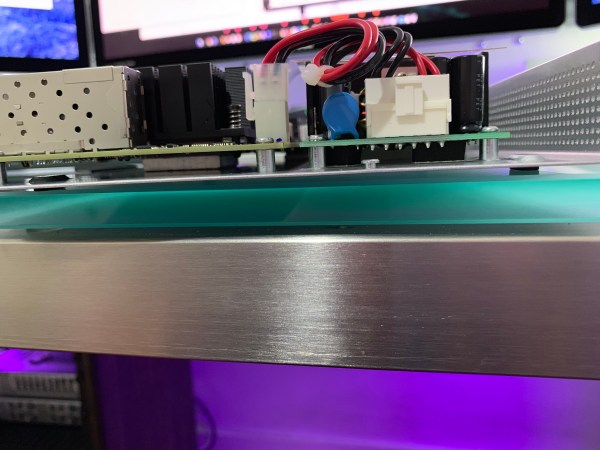
The CPU is thermally interfaced to the bottom of the switch

Voila! Confirmation, as you can see on the middle left beneath the CPU.  Funny because basically every attempt I’d seen at cooling the US-8-150W involved cooling the top case.

This brought me to my final step.  I didn’t really want to flip the switch over to cool it … and, besides, was there any reason I couldn’t just interface the passive heatsink inside to the top case?  I had several 100mm x 100mm x 1mm thick thermal pads that I had intended to use with the passive heatsinks, so I decided to see what I could do with them.

IMG_5428

Thermal pads applied

The passive heatsink is about 60mm x 60mm.  Simply cutting a single 100mm x 100mm pad into 4 pieces and stacking them up wasn’t perfect, but it would be enough for my testing.

After laying down the pads one at a time and gingerly sliding the case off and on, I determined a 4 mm thickness seemed adequate.  Also, because the top case doesn’t go straight down onto the bottom case, I found that placing the pads offset about 10mm to the front was a good idea.  By doing this, putting the top case back on and sliding the case back to latch it would “smush” the pad into approximately the right position.  (P.S. If I did this again, I’d just use a 4mm thick pad)

Finally, the moment of truth.  After putting everything back together, the CPU temp was a mere 62C without any fan attached!  The top case also had a much hotter area above the CPU as you would expect.  Simply adding the thermal pad had dropped the temperature 7 degrees!

Frankly, that level of temperature drop was good enough for me.  But since I still had the fan around, I placed it directly over the top case hotspot on low speed.  This reduced the CPU temp to 59C.

At this point, I didn’t feel like I needed any more improvements, and closed everything up for good.

Conclusion

First, the thermal interface to the bottom of the switch is important.  It means that if you want a zero effort way to improve cooling, you should try to cool the bottom of the case first and not the top (although blowing air through the side vents should still be quite effective).  Most of the ad-hoc approaches I saw were probably unaware of this fact.

Second, it turns out that simply interfacing the passive heatsink to the top case via a 4mm thermal pad is a shockingly effective way to lower CPU temperatures inside the US-8-150W.  Now you’re utilizing both the bottom and the top surface area to dissipate heat, plus exposure to free air flow is greater as well.  This all has the bonus of requiring no moving parts or extra power and is basically a “strictly better” kind of fix.

Third, I am quite sure that this mod could be performed on other UniFi products as well, especially the US-8, US-8-60W and USG-3P.  I don’t know if my cooling requirements for those products and others require me to go perform a mod on those just yet, but you may find it useful.

Posted in Networking, Technology | Leave a comment

Nest Temperature Sensor impressions

It’s not uncommon for a thermostat to be located somewhere that doesn’t correlate well with the area you really want to be temperature controlled.  In fact, it’s probably the rule rather than the exception.  Thermostat placement is often dictated by convenience (aka how hard is it to run wiring from the HVAC unit) rather than the optimal location for measuring the temperature.  And, even then, HVAC’s often cover a wide enough space that there isn’t necessarily one thermostat location that can cover all your use cases.

The Nest Thermostat was released in 2011 … seven years ago.  As soon as that thermostat was released, people asked “Can we get a remote temperature sensor?”  After all, that’s the promise of a smart thermostat … doing things smarter.

Well, seven years later, and we’ve finally got it.  Yes, that IS a hint of sarcasm.  The inability to release such a basic addon speaks to some organizational issues at Nest, but let’s not speculate about that.  The point is that it took way too long.

My problem and hoped for solution

One of my thermostats is located in an area that gets direct sun during the day.  The temperature at that time is obviously wildly incorrect, even with the “sunblock” feature on the thermostats.  The hope is that one of these temperature sensors can be placed in a more general location in the room out of direct sunlight.

The other problem we want to solve is shifting the temperature target to the bedrooms at night.  One of our HVAC’s services both one half of the living room and a bedroom, and the thermostat is actually in the living room.  So the problem and solution here are self evident.  Use the temperature sensor in the bedroom at night time.

A third problem, which is a very minor issue, is that my study is located relatively far from its HVAC unit, and the area gets hot while gaming due to my PC’s power consumption.  Wouldn’t it be nice if I could somehow tell the AC to run if that area gets hot?  We’ll see.

Unboxing and hardware

At 39 dollars, the sensor isn’t too expensive.  At 99 dollars for 3, you even get a bit of a discount in bulk.

The sensor, however, has some inherent flaws out of the gate.  Despite the Zigbee radio built into the 1st and 2nd generation Nest Thermostat (ostensibly to enable devices exactly like this sensor), the Nest Temperature Sensor only works with the Nest Thermostat 3rd Generation and Nest Thermostat E via Bluetooth LE.  So a lot of people will have to throw away perfectly good Nest Thermostats just to use one of these.  In my mind, it feels like punishment for adopting the Nest Thermostat early.  Not so smart after all?

I ended up picking up a 3rd Gen Thermostat off eBay on sale to replace one of my 2nd Gens.

The hardware itself is sufficiently polished.  It’s a simple 2″ diameter white plastic puck with slightly recessed nest logo on it.  On the rear, there’s a peg hole for mounting the puck on a wall, and a tiny removable battery cover for CR2 battery inside, which should last about two years.  Overall, I’d say the hardware itself seems impeccable.  If I had to nitpick, it would be nice if we could plug the sensor into an outlet … never having to think about the battery life of the sensor has some appeal.  But overall, the design seems nearly perfect.

Installation and software

The software experience, unfortunately, is less so.  You add the sensor by scanning a QR code on the sensor or entering some identifying information manually.  Then your thermostat looks for the sensor and you tell it what room the sensor is actually in.

Unfortunately, there is some sequence of events wherein adding the sensor and the app status itself can get out of sync with the server.  The result is an endless sequence of where you change the location of the sensor, the app shows it update, and then the next time you open the app, the sensor is right back to its old location again.  Completely infuriating, and only fixed when I deleted the sensor entirely and fiddled with the thermostat itself.

Apart from that, if you think about it, technically you only need one thermostat to be the bridge that relays the temperature from the sensors to the rest of the thermostats in the house.  Well, that would be nice, but Nest’s engineers were not kind enough to go that extra mile for us.  You actually do need to purchase a compatible thermostat for every HVAC unit you want to control via remote sensor.    Again, this feels like punishment for the early adopter.

But OK, at least that problem can be solved with money.  There isn’t any reason you should have to upgrade every thermostat in the house, but it can be done.  Now we get to the core issues with the software.

The app lets you set what sensor to measure the temperature at during certain times of day.  Great, that makes sense … after all, one of the most common use cases is ensuring the bedroom temperature is properly targeted as you go to bed.  The problem here is that the windows of time for changing sensors are fixed.  Morning is 7AM to 11AM, Midday is 11AM to 4PM, evening is 4PM to 9PM, and Night is 9PM to 7AM.  “OK, what if I don’t go to sleep at 9PM?”, says virtually everyone who buys this sensor.  The answer is “Deal with it.”

The second issue is that there isn’t anything you can do aside from targeting a specific sensor.  For example, what if I want the minimum temperature in a few rooms covered by the HVAC to be 68 degrees during the winter?  Sorry, can’t do that.

The third issue is that the sensors themselves aren’t motion detectors.  Motion detection helps with targeting the temperature to rooms you are actually inside.  Again, fulfilling the smart thermostat promise.  But not here.  Perhaps in yet another iteration?

Theory vs Reality

Now, while I complain above a lot, my actual use cases are slightly better.

  1. The direct sunlight issue on one of the thermostats in the morning is definitely improved by having the remote sensor in an area out of the sun.
  2. The “Night” window of time for the second bedroom is completely wrong (starting at 9PM is way too early), but our unit is temperate enough that having the window start early is not much of an issue.
  3. The “hot study” is not very improved, but that’s mostly a function of the room to cool being too far from the HVAC system to have much impact.  Nothing really to do here … I wasn’t expecting miracles.

Conclusion

The best thing that can be said about the Nest Temperature Sensor is that it mostly works.  The key word is “mostly”.  The hardware itself, aside from compatibility, is pretty good.  But, as an entire package, it does not “just” work, nor does it work smartly or intuitively.  In fact, short of being broken completely, it is the least advanced implementation of a remote temperature sensor that could possibly be conceived.

The fixed time windows are completely unnecessary and restrictive.  The lack of ability to target multiple sensors, either via minimums and maximums or averages, is behind other smart thermostats on the market.  The out of the box experience with location assignment of the sensor was borderline “return it” bad.

Overall, I hope some of the issues will be resolved in software, although it is seven years and we still don’t have a way to lower the temperature or hold it for a set period, so that may be just a tad too optimistic.  With that said, adding the sensors did improve my overall HVAC setup somewhat.  I find this product falls well short of its potential, but still improves any setup where you already have or plan to buy a compatible Nest Thermostat.  If you have to throw out an old Nest Thermostat to upgrade, it is unlikely to be worth your while.


Posted in Google, Home, Uncategorized | Leave a comment

A plug and play USB 3.0 Gigabit Ethernet adapter for Mac’s

nwtadpu3gige_gall2In a previous blog post, I noted the insane lack of simple Gigabit Ethernet adapters for Mac’s.  Even the ones that claim to be “plug and play” have some bad reviews when it comes to handling resume from sleep or just generally behaving well long term.

There seems to be a solution to this, and it’s the NewerTech USB 3.0 to Gigabit Ethernet adapter.  The price is right at just 16.75, and in testing with my desktop, it seems to just work.  I went a few days and didn’t notice any difference between it and my integrated Ethernet port.

Of course, this may be a bit too late considering the new Macbook’s are all USB-C, but in general, the Mac world has only just started the transition.  There are still a LOT of people out there who could use a good Ethernet adapter for simple docking at home or on the road.

Posted in Apple | Leave a comment