Over to WordPress

Made the switch today.  Looking OK so far, tho I seem to have lost most of my image links.  I suppose that’s the price of progress, eh?

Auto sharing to Facebook and other networks seems to be possible now.  These weren’t even options when I started the blog the first time.

Posted in Uncategorized | Leave a comment

Vegas tip – don’t get “longhauled”

Pro tip to the inexperienced.  In Vegas, there’s the short way to get to your hotel on the Strip, typically via Swenson and Tropicana.  This comes straight out of the north end of the airport and should cost you around 15-20 bucks with no traffic.

And there’s the long way … via the freeway that comes out of the airport south, and around to the strip afterwards.  The fare can run up to 30-50 dollars.

Going the tunnel/freeway route means you got “longhauled”.  It’s a generally a crime if done without express permission, and it is still done all the time by cabbies trying to run up fares.

What does this look like?  Here’s a google maps example going to Aria.

Here’s an article by the Las Vegas Review-Journal about the extent of the longhauling problem and the ineffectiveness of the crackdown.

http://www.lvrj.com/business/going-the-long-way-costly-cab-trips-grow-into-epidemic-148421785.html

Always tell the cab driver that you want the shortest path to your destination and “no tunnel”.  Don’t say quickest, because quickest is discretionary, and lots of cabbies like to claim that it is quicker to go via the freeway.

Posted in Uncategorized | Tagged | Leave a comment

Forza Motorsport 4 – TSW 6-speed shifter with the Fanatec wheel, via Arduino

Forza Motorsport 4

Forza 3 and my first shifter approach

In my previous post, I discussed my dissatisfaction with Forza Motorsport 3 and the SST Lightning shifter I modified to work with it.

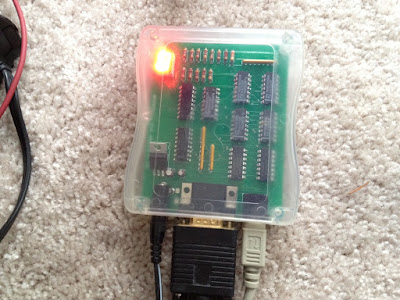
I was always aware that my original circuit design was less clean than it could have been.  For one, it required direct modification of the third party shifter … which is usually not pretty.  Two, it used a lot of different IC's that probably could have been consolidated into the logic of a single microcontroller.

However, I was generally aware of the tradeoffs between the two and made the decision to go with a bunch of individual IC's consciously at the time.  For one thing, I actually wanted to print a circuit board.  Second, I decided it was more important to go through the motions of it as a learning experience rather than focusing on an optimal design.  And, third, I could always take the microcontroller approach the next time.

Future goals for my next shifter

Find a better shifter

With the generally unintuitive behavior of the SST Lightning, my next shifter needed to be something that I wouldn't feel ashamed of putting in front of any normal stick shift capable driver.

Parse the USB output directly with an adapter

Creating a custom circuit board and modifying a shifter is far too difficult and complicated for most people, and it isn't first option that comes to mind when you think of ways to make a third party shifter compatible with your own steering wheel.  The natural inclination is to just put an adapter of some sort between the wheel and the shifter, without modifying anything  So that's what I wanted to build this time around. 

The release of Forza Motorsport 4

The above thoughts percolated for many months while my sim racing cockpit sat idle.  As Forza Motorsport 4 gradually approached its official release date of October 11th, 2011, I resolved to go fix my rig in preparation for the new game, even though the new game honestly didn't look all that different.

Finding the new shifter

It's hard to say how exactly I found it, but suffice it to say that, after occasional bouts of 30 minute Google search sessions, I ran across the TSW 6 speed shifter and some associated useful reviews.  Check out the following features.

  • Centered on gears 3/4
  • Decent throw
  • Reverse all the way on the left with extra resistance
  • Gear below reverse locked out

I don't know how I managed to miss the existence of the TSW shifter in 2009, but it became quickly apparent that I had chosen the wrong shifter two years ago.  This was what I needed.

OK, it was a bit expensive, but it wasn't going to be possible to build a shifter like this on my own right now. One criteria down.

Figuring out how to build the adapter

The platform – Arduino

The Arduino is a popular low cost and open source micro controller platform.  The basic version of this can be picked up for around 30 dollars.

Luckily, I had an Arduino Duemlianove that had been sitting around in my apartment for a couple of years from a Sparkfun talk at Google.  It's always strangely coincidental how you find a use for things that you could never have anticipated.

The USB Host Shield

Of course, just having an Arduino lying around doesn't do you much good.  You need a way to physically connect to the USB shifter, and you need to be able to host it via software.  Arduino's can be expended by the use of "shields", which are essentially just additional boards that can be stacked on top of the Arduino.  With shields, you can add Ethernet ports, wireless modules, and all other kinds of expanded functionality to an Arduino.

Luckily for me, someone developed a USB Host Shield that stacks on the Arduino and provides you one standard size USB host port to interface with USB devices.

With the Arduino and USB Host Shield, it looked like I would have everything I needed to build my adapter.  Second and last criteria met.

Putting it all together (The old way)

The TSW shifter was the first part to arrive.  My Arduino project was going to take a lot more time to come together, so, in the mean time, I decided to figure out if I could hack up a way for the TSW shifter to work with my SST Lightning adapter.

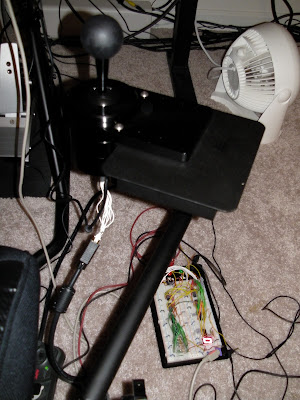
It turns out that not only is the TSW shifter nicer in build quality than the SST lightning, it's also better for modding too.  The switches are wired via ribbon cable to a controller PCB mounted on the outside of the shifter.  This means to access the switches, all you really need to do is pop the ribbon cable off the PCB and stick header pins into the ribbon cable.

The only difficulty here is that the TSW shifter operates active high (All switches are 0V by default, and the active one is 5V) instead of active low (default 5V, active 0V) like the SST Lightning.  So to make the shifter work with my SST Lightning circuit, I needed to invert the switch values before passing them in.  I built a simple circuit to do this.

I placed the inverter circuit between the TSW shifter and my SST lightning circuit … and it worked as expected in the game.  I was actually quite pleased with how well the TSW shifter played in the game.  I now knew that the TSW shifter was going to work one way or the other, and that I could spend some additional effort and time on the Arduino approach while having a working TSW shifter in game.

Putting it altogether (The new way)

First milestone: Do anything with the Arduino.  That wasn't too hard at all.  I just downloaded the Arduino Development Kit for Windows, plugged the Arduino into my USB port, and I got an LED to blink on the Arduino.  Success!

Second milestone: Finding a way to interface with the joystick.  This was the trickiest part.  I attached the USB Host Shield to the Arduino, and then attached the shifter to the USB host shield.

The makers of the USB Host Shield have supporting code for it that is on version 2.  Unfortunately, the USBJoystick code I found on the net was meant to work with version 1.  I spent a couple of days messing with porting over the code for the USBJoystick to v2 before I realized it would take too long to understand how everything worked.

Eventually, I gave up on the port and just compiled the old USB Host Shield (v1) code on the Arduino along with the sample USBJoystick code to see if it would work.  Debug outputs started popping out of the serial monitor with every shift.  Success!

Third milestone: Output analog voltages from the Arduino to the Fanatec wheel.

Now, the tricky part about micro controllers like the Arduino is that they don't output analog voltages.  They generally either out
put either 5V or 0V.  Being microcontrollers, however, they can do this switching very often and very quickly.   In order to get an analog voltage, what you need to do to get, say, 3V, out of the Arduino, is output 5V 60% of the time (3V being 60% of 5V, of course), and use a low pass filter to smooth things out.

What are the implications of doing this?  Well, you need to select an appropriate resistor and capacitor that creates good low pass filter characteristics for your intended application.  And your actual output has some deviations from a true analog voltage output that you need to be aware of.

Ripple – Because the microprocessor behind the scenes is constantly flipping its voltage from 5V to 0V and back again, the actual output from your low pass filter will never settle at an exact value.  Instead, it will bounce around your target voltage value.  Allow too much ripple in your filter output, and you could end up sending unexpecting values or voltages downstream that you never really intended.

Settling time – The time it will take for your filter output arrive within some acceptable range of your target output is now non-trivial.  For dimming Christmas lights, this probably isn't a big deal, but for gaming, you can imagine that it actually matters a bit.

Ripple and settling time are at odds with each others.  You can reduce the ripple in your filter output, but at the expense of the settling time when the desired output changes.  That's why knowing your application needs is important.  Turns out that there's a really good calculator for displaying the results of a low pass filter for PWM in Japan.  I used the heck out of this and it came in very handy, as you'll see next.

Fourth milestone: Reduce the latency of the switching as much as possible

Of course, in gaming, it's important that controllers be as responsive as possible.  One of the advantages of my old circuit was that the response time would have been nearly instantaneous.  Now, with my new adapter, there would be a slight lag time in polling the USB outputs, plus a settling time required by the low pass filter.  Instantaneous was no longer in the cards.

In order to reduce the latency, the first thing I did was up the polling frequency in the software for the Arduino.  It was defaulting to 50 ms in the USBJoystick code, which was way too long.  I changed it to every 1 ms.  This seemed to work (although the real polling frequency was more like every 2 ms due to actual code execution).  Anyway, no ill effects, and that chopped a good 48 ms off the latency of any shift.

The second piece of this was to select a decent looking low pass filter.

I'm not going to break this down tremendously, but the default PWM frequency out of the Arduino is about 1 kHz, so in order to minimize latency and keep ripple within reasonable levels, I selected a 4.7k resistor and a 1uF capacitor.  This produces a transient analysis that looks like the following.

As you can see, it arrives at the 90% mark in around 10 ms.  I could have improved the latency more by testing the exact limits of the ripple (I was very conservative on this for obvious reasons), or by modifying the Arduino timers to switch its PWM outputs faster.  This turned out to be more of a pain in the ass than I had hoped, so I ended up skipping it and taking the 10ms hit (which isn't that much anyway).

Fifth milestone: Make it look reasonably nice

This is where the Arduino Protoshield comes in.  It's basically an Arduino shield with a prototyping area where you can put your own stuff.

Anyway, there's not much to say here.  The low pass filters and the outputs of this filters into the Fanatec wheel have to go somewhere, so they go here.  I also added a mini DIN breakout board for the 6 pin connector (that interfaces to the Fanatec wheel).  With the right combination of resistors, capacitors, etc … you end up with something like the below.

Finale

Here's the final product.
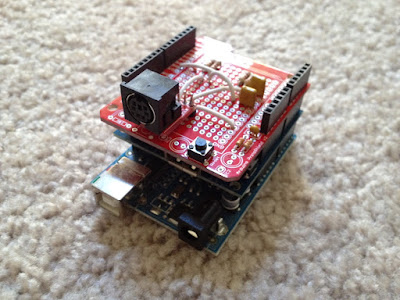
  • It's powered by any USB port.
  • It interfaces directly with an unmodified TSW 6-speed shifter (and powers it as well).
  • It has a standard 6 pin mini-DIN port (aka PS/2 port) that can be connected directly to a Fanatec wheel.
  • The top shield is my custom output shield to the Fanatec, with the low pass filters going to the 6 pin mini-DIN port for the Fanatec, the middle shield is the USB Host Shield, and the bottom is the Arduino.

It would be nice to put it inside a custom enclosure of some sort, but I think that's going to be unlikely unless I can find a 3D printer to work with (and learn how to use it).  Anyway, it's pretty sturdy as is … and perhaps more interestingly, much easier to replicate off the shelf by others.

Finally, here's a YouTube video that puts this all together – http://www.youtube.com/watch?v=2utk_62blmM.

Hope you enjoyed the walkthrough!

Posted in Uncategorized | Tagged , , , , , | Leave a comment

SST Lightning with Forza and the Fanatec wheels – not good enough

History
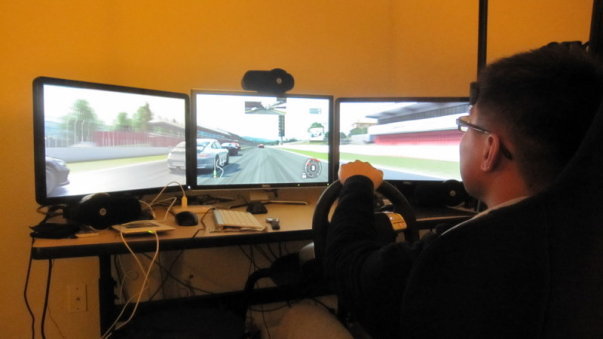
Some of you may remember that when Forza Motorsport 3 came out, I built up a pretty elaborate rig to use with the game.  Features included:
 
  • A full steel frame cockpit by Obutto
  • High end steering wheel and pedals from Fanatec
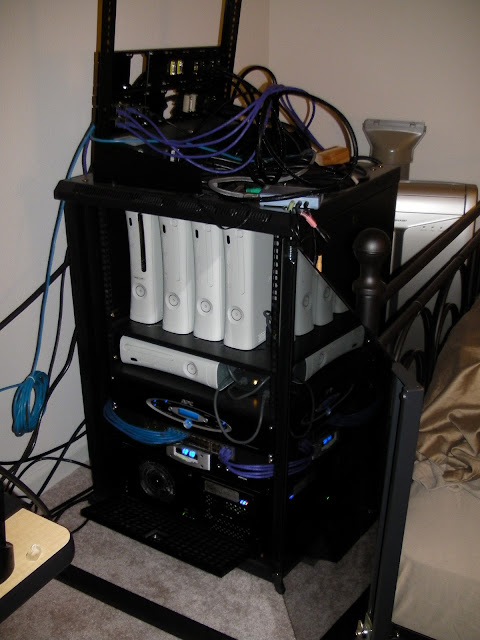
  • Anywhere from 3 to 5 Xbox 360's at one time driving triple screens and rear mirror/spectator cams
  • A small rack holding all of that equipment behind a UPS and surge protector.


The centerpiece of the whole rig, in terms of effort, however, was the custom circuit I designed to make the SST Lightning (a standard USB shifter designed for PC gaming) compatible with the Fanatec wheel.
 
 
As it turns out, I never really used the rig that much … and, although I presumed the SST Lightning was going to be a really high quality shifter when I purchased it, that actually wasn't the case at all.  In fact, the SST Lightning has a couple of major problems.
Problems with the SST Lightning
 
 
Positives
Solid, 360 degree mounting options – The shifter is made of solid aluminum and rotates 360 degrees within a heavy duty clamp that can be mounted to pretty much anything.  It's a good design in this respect and won't move around on you if mounted to something solid.
 
Click shift action – The click action is smoother than the Fanatec provided shifter and snaps into place more cleanly and readily.
Negatives
2nd gear doesn't always engage – It's too hard to explain here, but tolerances are such that the ball detente mechanism used to snap and keep the shifter in place is slightly off.  In essence, if you move the shifter fully in, the gear makes contact.  However, the gear actually wants to snap in just before it is fully making contact.  If you shake the shifter a little, it will pop into place and lose contact with the gear.
I was able to fix this with some electrical tape over the switches to thicken the contact area, but that should not have been necessary.
Difficult to modify – Wiring out the contacts from the shifter bottom to make them work with my circuit was major work.  This is not a shifter that wants to be modded.
Poor feel (Short throw) – Despite the positive I listed above on this point, it's better than the Fanatec provided shifter, but still not very close to a real 6 speed shifter.  It feels like a lightweight toy or joystick, not a shifter.  "Dinky" might be the right word.
 
Poor feel (Not centered on gears 3 and 4) – Probably worst of all, it's an 8 position shifter that isn't centered on gears 3 and 4, but instead centers between gears 1/2 and gears 3/4.  For anyone that's driven stick in real life, this is completely unintuitive and hard to get used to.  In addition, with the throws being as short and light as they are, it's very easy to miss a shift since there's not much of a difference at all in motion between going into 3rd and 5th gear.
Poor feel (no Reverse/empty gear lockout) – In a normal 6 speed shifter, there is a lot more resistance moving the shifter over to the left into Reverse, and you can't move the shifter at all into the space below reverse.  Simulating this is something the SST lightning just doesn't try to do.  Again, combined with the unusual non-centered layout of the gear pattern and the shortness and lightness of the throws, you'll be hitting the wrong gears a LOT.
Embarrassing – In the end, although the shifter worked, friends who came over to try it out would constantly miss shifts and get confused.  All I could do was apologize to anyone that came over for how the shifter worked.
Moving forward
 
As you might have guessed, I was pretty happy with myself in terms of actually being able to engineer the translation circuit and build out a clean PCB to bundle it all up.  I learned a lot from the challenge and that was probably more important than anything else here.
 
But, in the end analysis, I wasn't all that happy with the actual setup, and combined with the fact that Forza is actually more of a sandbox game than it is a structured game with accomplishments for you to reach, etc … it didn't feel like much fun.  It probably didn't help that by the time this all came together, I also had a real car to take to the track!
 
But fast forward to nearly two years later.  Forza Motorsport 4 would be coming out in October (and has as of now), and I wanted to see if there was something more I could do to fix up all of the initial effort I had put into this.  And that leads into the next post … a new shifter and a new circuit board.
 
Posted in Uncategorized | Leave a comment

iCufflinks

These cufflinks look amazing.  Basically the breathing suspend lighting pattern in a CNC machined aluminum cufflink.  Am I a fanboy for wanting them? 

http://www.adafruit.com/products/379

Posted in Uncategorized | Leave a comment

Picking a color for your new iPad 2

While you're all waiting to get your new iPad's (I am too!), you might be struggling with the idea of what color to get.  Contrary to what you might think, it's not just personal preference.  There are real functional differences between the two.

Let's draw analogues to other consumer products.

First, TV's.  You may note that with very few exceptions, all TV bezels are done in black/dark grey/steel tones.  Interesting, no?  The reason for this is that a bright colored bezel will distract the eye and make the viewer acutely aware of the edge of the screen at all times.  It's slightly more immersive to have a black bezel, which allows the edge of the screen to dissolve into the frame in many cases.

Second, cars.  If you are a car person, you know that the reputation of black cars is one of requiring high maintenance to keep looking pristine.  Dust and fingerprints contrast heavily with a shiny black frame.  On a white iPad, this kind of dirtiness is hardly noticeable on the frame, although the screen itself may still present temporary uncleanliness.

Last, I've heard it claimed that the white iPad is a little less prone to overheat in sunlight due to the heat reflectiveness of the bezel.  I'm not sure if this is true enough to an extent that it is noticeable, but, hey, why not mention it?

In the end, of course, what probably matters most is that you pick the color you feel more emotionally connected with.  But it's fun to note that even tiny choices like color have real physical implications upon the way you use a product like the iPad.


Posted in Apple, Uncategorized | Leave a comment

Picking a computer to encode videos with

So let's say you just bought some sort of new Boxee box or Apple TV, and you have a lot of videos you want to watch on them.  You need to process those videos into a device friendly format, and you’re thinking about building or buying a dedicated machine to handle the job.  What do you buy?

Not surprisingly, the answer depends pretty heavily on what you're trying to optimize for.

The choices

Optimize for peak throughput.  For example, a tv show airs, you record it to your PC, and you want it ready to stream or transfer to any number of mobile or in-home devices as soon as possible.

Optimize for total throughput.  You have a bunch of DVD's or Blu-Ray's and you want to queue them up and convert them as quickly as possible, in total.

Optimize for energy consumption.  You want a little bit of everything above, but what you don’t want to do is inflate your energy bill or consume watts like crazy over the course of the year.

And let’s just assume you’re always optimizing for cost, within.  You need to decide how much roughly how much throughput you want … but going too cheap actually results not only in low total throughput but also unacceptably low throughput per dollar.  Going expensive will net you higher peak throughput, but higher total throughput might be better served by extra machines, not just a single beefy machine.  We’re not building supercomputers here. (yet!)

The details

Peak throughput – Your best bet here is a single processor system with a lot of cores (probably around 4), clocked as high as possible.  A lot of modern encoding systems can use multiple cores, but simply adding cores doesn't scale indefinitely.

The most economical single processor systems for this scenario tend to be Core i7 based.  Even though AMD’s processors are generally a good bang for your buck, Core i7 systems actually have a leg up over AMD's processors in this case because they are:

1. Easily overclockable
2. Especially efficient at encoding videos
3. Hyperthreaded (The extra logical processors actually help significantly here … on the order of 10 to 20%)

GPU-based encoding solutions.  Video encoding, falling squarely in the parallelizable camp of problem sets, is often held up as a poster child for GPU-accelerated software.  In practice, however, these encoders are poorly optimized compared to general purpose encoders.  These tend to yield interesting speed increases at the expense of quality per bit and all of the flexibility that traditional software provides.  In short, academically interesting, but not particularly practical.

For reference, I took a 1080p reference video and encoded it to an 720p .m4v using the High Profile settings in Handbrake.  The system had a 3.06GHz Core i7 with hyperthreading enabled (4 cores, 8 logical processors). The source video was 134 min., and the encode itself took 103 min.  Faster than real-time is always good!  I don't want to overload this post with stats, but that should give you a feel for the scale that we are talking about.

If you want to spend more money, you can always buy a 12-core Mac Pro or build the equivalent.  But benchmarks show that jumping from four to twelve cores here doesn't make the encodes three times faster … only 1.42 times faster.  So you'll have to decide whether the extra money is worth the diminishing returns increase in speed.

Total throughput

OK, so we established above that, past a certain point, multiple cores stop helping as much with the performance of a single encode.  Looking at Handbrake, it scales pretty well up to 4 cores, starts to diminish from 4 to 8 cores, and drops off significantly from 8 to 12 cores.  In other words, that 48-core system isn’t going to help you much.  But what you CAN do with that many cores, assuming you have multiple files to process, is run multiple encodes at once … enough so that you have roughly the ratio of encodes to optimal number of cores.  Sure, the encodes will bump into each other somewhat, but the total throughput/utilization of the system will be much closer to optimal than if you just ran one file at a time.

Unfortunately, buying more than four cores on a single system right now is just not that cheap.   The multiprocessor scenarios for adding extra cores seem to fall into the business segment of the market and now your cost increases rapidly.  If your objective is not raw speed on a single system, you can get more total processing power per dollar by simply buying and building more single processor Core i7 systems.  The problem then becomes the coordination necessary to distribute the encoding work amongst multiple machines.

Going green

Now this was a topic I found interesting.  It turns out that going really green with a full encoding load is kind of difficult.  Computers range in green-ness all the way between really green (Mac Mini 2010) to really power hungry (Mac Pro 2010).  Most desktop computers aren't designed to be that green.  The best example I could come up with … the Mac Mini 2010 … still doesn't compete that favorably with a Core i7 running at 3.6 GHz if you are comparing them at full load.

For example, if you assume, living out here in California, that your cost per KWh is $0.30, then you end up with the following, based on some other tests I ran on my own machines using a 720p source as the reference (so not comparable to the other test above).

  Mac Mini 2010 Homemade Core i7
Purchase price

$999 ($699 base) $699
Watts under full load 30 200
Source hours processed per day 11 50
Cost per 1000 source hours 65.00 96.00

So yep, the Mac Mini does pretty well on the energy efficiency side of things, but surprisingly the high powered Core i7 holds up pretty well too, just because it's so damned good at encoding video! 

Where a machine like the Mac Mini 2010 really wins out is on the idle side of things, tho.  So if your pipeline sits around unutilized for decent stretches, the 10 watt idle power consumption of a Mac Mini vs a desktop’s 100-150 watts adds up quickly.  It's actually for this reason that I use a Mac Mini as my primary desktop and leave the high powered machines off unless I want to do something requiring serious horsepower … like playing a video game.

It turns out, however, that you really shouldn't expect to win much back over time in terms of the dollars saved in energy costs.  Encoding 1000 hours of video is a LOT, and you only make back 30 dollars over that range, even with the high energy costs here in California.  It just doesn't add up to much.  And Core i7 desktops are not that expensive, especially compared to Mac's!  You can bet the Core i7 system is going to have a much longer useful lifetime.

In short, what I found was that, despite the desire to be energy efficient, you'd be hard pressed to make your money back in energy savings over time.

What isn't that important

RAM – You only need enough to run the encoding jobs comfortably and no more. 2GB in a pinch, 4GB is plenty.  I would go with 4GB at least just so that you can actually repurpose the computer for something else if desired.

Hard drive space – You need just enough space to buffer the input and output files reasonably.  Regular hard drives are fine and SSD's are overkill unless you plan on multitasking the machine heavily with other workloads.  Even something like a 120GB drive is probably safe … but nowadays, reasonably cheap drives start around at least 320GB for notebook drives and almost 1TB for internal desktop drives.

Network throughput – In a more complex encoding scenario involving multiple computers, network throughput becomes a significant factor as you start having to shove bits around to get them encoded on different nodes.  But it's not really relevant to the current discussion.

 Summary

Obviously there are quite a few factors I haven't included here for the sake of brevity, but the upshot is that a lot of factors push you towards the single Core i7 build when it comes to encoding performance as defined on a number of fronts.  What's going to be really interesting in future is the advent of massively cored systems on the horizon.  Eating the energy overhead of individual systems is not so great and having many cores on one system could alleviate that problem as well as push the performance envelope in terms of encoding parallelization.

Posted in Uncategorized | Leave a comment

The Walking Dead

AMC has a massive ratings hit on their hands.

It's definitely well deserved.  The show itself is uncomfortable and bleak, just like you expect life in the zombie apocalypse to be.  It takes its subject matter seriously, unlike so many of its campy brethren.  That provides plenty of real opportunities for drama.

If I had to be critical of the show, it's that some character behavior is done clearly for dramatic purposes.   The protagonist wakes up and stumbles around in the apocalypse without shoes for 15 minutes.  Strange as it seems, that was what made me uncomfortable.  Not the fact that there were zombies locked behind a door.  Just the fact that walking around had to mean he would be stepping on glass and that he would be running really slowly if he actually did encounter a zombie.

Rick (the sheriff protagonist) must have feet of leather.  If I woke up in a hospital full of debris, you can be damn sure the first thing I would be doing is stealing someone's shoes.

More importantly, however, there are points where you wonder why the protagonist doesn't just come out and ask what the hell is going on.   That's all I would be doing every time I met someone.  Try to figure out what's going on.

Instead, everything is treated like one long reveal … as if there is a path of discovery and the characters need to not ask questions so that we'll have a steady dose of new information each episode.  I'm not a script writer, but I feel like there has to be a better way.

Regardless, I'm addicted.  I'm surprised that the season is only 6 episodes, however.  This must have been either a real financial commitment or considered a risky development if they had to limit the season length to something that short.

Right now I'm saving the last 3 episodes to marathon them in one go next week with some friends.  I figure that's as close as we'll get to a real "zombie night" around here!

Posted in Uncategorized | Leave a comment

Gaming in stereoscopic 3D

Stereoscopic 3D is a great technology, even with all of the inherent flaws and glitches that exist in today's implementations.  But while movies are the main way most people are finding out about three dimensional viewing, in reality, gaming is a much more interesting way to take advantage of 3D viewing.  Here's why.

Gaming requires more immersion and focus

Today, the requirement to sit in front of the TV and wear glasses inherently limits the number of viewers and the freedom of the viewer to go do other things.  Not great, especially when you're walking around the room doing other things or watching with other people.

However, most gaming is done in a single player or solitary context.  In this sense, it requires focused attention from the gamer anyway.  Therefore, you aren't really losing much by asking the gamer to put on some glasses or sit directly in front of the TV … he's already doing it.  In return, the 3D presentation of the game makes the game more immersive and engaging.  Gaming is a much more natural place to take advantage of stereoscopic 3D because the viewer has already decided to dedicate his attention and focus to begin with.

3D environments in games are presented in real time

Because 3D viewing is in a transitionary period, many movies are shot with a relatively shallow depth.  For an experienced viewer, this is unfortunate … it is not difficult for them at all to see scenes presented in a deeper and more realistic manner.  Unfortunately, it is impossible for the filmmaker to go back and reshoot those scenes with more depth … the movie is fixed at its current depth forever.

Gaming is different.  First, on a technical basis, you can adjust the depth of any 3D scene to something that you, the viewer, are comfortable with handling.  This is much better than having to use the lowest common denominator that is generally given to you by a filmmaker.

More importantly, games can represent fantastic huge realities in 3D that could never be explored interactively within a movie.  I will state without any doubt that you really can't appreciate the artistry of how someone has designed an entire city within a game until you experience actually standing within and moving around it in stereoscopic 3D.

To put this another way … the sense of perception is greatly enhanced when viewing a movie in 3D.  The sense of exploration … the feeling of moving within something new … is greatly enhanced when playing a game in 3D.

3D gaming is often still glitchy

The nice thing about games today is that nearly all of them are rendered using three dimensional data.  In other words, the computer is already storing the scene you are viewing in 3D anyway … it's just presenting a 2D scene to you on your monitor.  To get to stereoscopic 3D, it's almost trivial to just render the scene twice as often (once for each eye) to create the illusion of depth for the 3D gamer.

Where this falls down is that most existing games assume you are viewing them using a standard 2D monitor.  What often happens is that special effects such as lights or menus are presented, using 2D programming "tricks",  in such a way as to look fine on a 2D screen but be seen at completely wrong or impossible depths in a 3D context.

Technologies such as nVidia 3D Vision take advantage of the fact that games are already 3D anyway to retrofit many past games for 3D gaming, but the aforementioned glitches are where the promise falls short of the reality.

Fortunately, as 3D gaming becomes more commonplace, you can expect developers to see the glitches during development and fix them on the spot.  Companies such as nVidia and Sony have a vested interest in making new games look good in 3D and are spending a lot of money evangelizing proper 3D programming techniques with developers.  Moving forward, these problems are likely to disappear quickly in newly released games.  But it's very difficult to go back and fix problems with older games.

Gaming in 3D can make you perform better … or worse

While gaming in stereoscopic 3D adds realism, that doesn't necessarily translate to better competitive performance.

First, your framerates will be significantly lower unless your system is overbuilt with enough performance slack to compensate.  A lower framerate can translate into poorer competitive performance.

Second, it takes time for your eyes to change their focus depth.  That split second can be precious when switching between a close by target to a far away one … something that you would artificially not have to deal with when playing in 2D.

Third, some games don't lend themselves perfectly to control schemes when viewed in 3D.  RTS's are an example where the cursor must float in 3D and adjust its selection dynamically.  It can feel unintuitive to select and move objects in these gaming contexts.

In short … there are not many cases where depth perception will enhance your performance in games as a player (although there are a few).  Depth perception is valuable only in very particular gaming contexts.  Think of it more as a way to add enjoyment or immersion, not a way to add extra wins to your scorecard.

Just so I don't leave this on a downer note, there have been two cases where I have found depth perception to be valuable.

The first is in Mirror's Edge, where you run across rooftops and must land precisely and often hit a button to roll as you land.  The depth perception added here by stereoscopic 3D helps significantly in judging in a split second how close you are to landing and where you are.

The second is any racing game (cars).  Depth perception helps you gauge the nature of turns quickly at high speed and also how close you are to touching other cars.

RTS's look OK, but are less impressive than other 3D games due to the fact that your view tends to be from a bird's eye perspective.  In my experience, UI selection of units can be glitchy, so best performance is achieved by playing in 2D.

First person shooter games are probably the best way to showcase any 3D setup … the immersiveness is amazing.  With a sufficiently high performing system, the difference in your performance will probably minimal until you get to high levels of play, but I do expect the disparity to become signficant at those levels.

Of course, any low pressure game like puzzle or adventure games will have no problems at all being played in 3D.

Summary

In short, I find gaming to be a far more fertile ground for stereoscopic 3D than movies … mostly due to the added immersion and interactivity.  I hope you agree.

Posted in Uncategorized | Tagged , , | Leave a comment

Visual anomalies with stereoscopic 3D display technologies

We all know what stereoscopic 3D should look and behave like … we see it every day.  Unfortunately, this isn't how stereoscopic 3D behaves in the home today.  Here's a list of ways where the idea doesn't quite match up with reality.

Color distortion

Glasses distort the color of the screen.  It's as simple as that.
In the case of active shutter displays, the glasses used to shutter each eye have a slight yellowish or greenish tint to them.  It’s an unavoidable side effect of looking through a liquid crystal lens.  In the case of polarized glasses, the distortion is not as pronounced and may be more color neutral, but it's easy enough to look through a pair of glasses and observe a difference in hue and contrast without the glasses on.
HMD and auto-stereoscopic display technologies don't suffer from color distortion directly as they have separate pixels directly allocated for each eye.

Significant loss of brightness and contrast

Active shutter displays refresh about 120 times a second.  That means that, even in an ideal scenario, each eye only gets 50% of the light.
However, we live in an analog world … and despite what you may initially think, the fact is that the switching doesn’t happen instantaneously.  What actually happens is that it takes time for the displays to transition from the left eye image to the right eye image and back again.  If each shutter were really open 50% of the time, a good portion of your time would be spent seeing the screen transitioning between frames … which would completely ruin the 3D effect.
In practice, what I see is that shutters are open about 25% of the time.  Keep in mind the glasses themselves don’t perfectly pass light through either.  So you’re probably talking about 20% of the original light getting through to each eye or less.
All that time you spent calibrating your TV to be THX spec?  Totally out the window with 3D glasses on. 

Top/bottom stereo extinction problems (or ghosting)

This is a specific problem with active shutter displays and an important variation on the loss of brightness issue. Most TV’s do not refresh every portion of the screen at exactly the same time.  Instead, they typically refresh each row of pixels from top to bottom.  Again, the shutter for a particular eye should not be open until the image finishes refreshing on the TV … otherwise all that eye will see is an incorrect blend of the previous and current image.
So not only do you have the problem of waiting for the screen to transition its pixels from the left to the right eye image and vice versa, the screen isn't even trying to change all the pixels at the same time!
In practice, this is a very big problem for LCD’s.  The screens can barely switch between each eye's image in time in order to provide an adequately long shutter time for each eye.  So the manufacturers play loose with the shutter timing in order to let enough light through to each eye.  Unfortunately, this means in cases where the screen doesn't switch in time (usually in high contrast scenarios such as dark building against blue or white sky), bits of the previous and next image are leaking through.
Another interesting aspect of this is that the leaking through of the opposite eye's image tends to happen more at the top of the screen.  Why is this?  Again, all refreshing happens from top to bottom … and the majority of the change in a pixel while it is changing happens at the very start.  So even playing slightly loose with the shutter timings can have a bad effect on the image near the top of the screen.

DLP projectors seem to have no top/bottom stereo extinction problems.  Presumably the design of the technology allows the images to flip nearly instantaneously. Plasma’s are also less susceptible to due to the fast duty cycle/switching times of the technology.

If you want to see this problem in action, I took a high speed 600 fps video of some 3D ready monitors.  The video shows these things in a much more clear way than I can describe by writing it.  Here's the YouTube link.

Fast motion stuttering

This is another active shutter specific problem.  The sequential display of left and right eye images in active shutter systems has additional implications for fast moving objects.  While the correct images may be getting to each eye, they are not arriving at the same time.  Is this a problem?  Yes, it definitely is.  The human brain is sensitive to this incongruency … and 120Hz is not a fast enough of a refresh rate for your brain to be unaware of the difference.  In short, 3D scenes with heavy horizontal panning will appear very stuttery and possibly disorienting.  This is not a problem for other 3D display technologies which display the left and right images at the same time.

As noted above, it may be possible for the the stuttering to be remedied by even faster switching times such as 240Hz, but the state of the art isn't caught up yet.

Overdrive ghosting

Another active shutter specific problem.  With current technology, most displays are just at the limit of being able to switch back and forth at 120Hz.  To achieve fast switching times, manufacturers use much higher voltage differentials than normal when a pixel transition begins.  This allows the display to get the pixel to the correct color more quickly.

Unfortunately, this is an imperfect process and has tradeoffs.  Over or undershooting the value results in the pixel not quite arriving at its intended value before having to switch back.  The end effect is weirdly colored ghosts of the opposite eye image leaking into the target eye.

Expensive shutter glasses

Each pair of active shutter glasses costs around $100 to $200.  For most people, that’s not an insignificant expense.  I would guess these prices will drop like a commodity over time … there's really no good reason for these things to cost that much.  But, for now, expect financial pain if you’re going to have more than one viewer at a time.

Glasses need recharging

Active shutter glasses last a long time if fully charged … around 40 hours.  Charging only takes a couple of hours.  But nevertheless, with the dearth of 3D content out there, it's pretty likely that your glasses will go unused for long periods of time right now.  So when you do finally decide to watch something, you may have to deal with some delayed gratification issues.
Off-angle/Off-level viewing issues
All stereoscopic 3D technologies, with the exception of HMD's, require the viewer to be sitting level with the TV and reasonably directly in front of it so that the left and right eye images are displayed properly spaced and oriented to each eye.  This means you can't lie on the couch and watch in 3D, and you also can't stand off in the corner in the kitchen and watch the TV in 3D while it's tucked away in the other corne
r.

Polarized displays and glasses have the additional problem of each lens actually letting through light from the other eye's image if you are not sitting perfectly horizontally.  Real3D glasses in the theater work around this by using circular polarization, which is not sensitive to the rotation of your head in the viewing scenario.  But since the entire stereoscopic 3D viewing process relies on your head being level and well placed anyway, this is of minor consequence. 

Conclusion

As you can see, stereoscopic 3D is the home is not just fire and forget … and it does not "just work".  In particular, active shutter displays have a host of problems not present in other display approaches … but they make up for it by being the cheapest way to go.  At least now you know all the ways things can go wrong!  Don't let this document scare you off completely though … I think the 3D viewing experience is very immersive and enjoyable in many contexts.  You just need to know what you're getting.
Posted in Uncategorized | Tagged , , , | Leave a comment